


Written by: Vytas Karalius, MD, MPH (PGY-2) Edited by: Andrew Cunningham, MD (NUEM ‘19) Expert commentary by: Jeffery Hill, MD, MEd
Nerve Blocks of the Head & Neck Part III:
Oral Nerve Blocks
“I can’t feel my face when I’m with you…. but I love it.” – The Weeknd
About this series…
This article is part of a series of articles on the nerve blocks of the head and neck. For more information on other types of useful nerve blocks, please refer to the links below:
Nerve Blocks of the Head & Neck Part I: Facial Nerve Blocks
Nerve Blocks of the Head & Neck Part II: The Occipital Nerve Block
Oral Nerve Blocks
What are the advantages to oral nerve blocks?
Regional nerve blocks can be used in the ED for their ease, efficacy and efficiency in providing anesthesia for common procedures and complaints.
Facial nerve blocks are particularly useful and have several advantages:
Better anesthesia: Provides comparable, sometimes even better, anesthesia
Less needle pokes: Provides complete anesthesia without multiple needle pokes, making them great for the difficult patient, and results in a happier patient and safer procedure
Less pain medications: Decreases opiate and other oral analgesic use
The Set-Up
In addition to the materials you might need for the rest of the procedure, you will need the following items for the nerve block:
Anesthetic (see below)
5mL or 10mL syringe
Blunt fill or 18 gauge needle
25-27 gauge needle
Gauze
Long cotton tipped applicators and/or cotton pledgets
Personal protective equipment – gloves and eye protection are a must
Bite block if necessary
Appropriate, dedicated lighting such as an overhead lamp
Choices of Anesthetic
For oral nerve blocks, use bupivacaine with epinephrine when available. Oral/dental pain can be immensely painful and compromise a patient’s quality of life. The longer you can provide pain relief until they receive definitive care, the better off they will be.

Table 1: Commonly used local anesthetics. Courtesy of our NUEM Clinical Pharmacologist, Dr. Kelsea Caruso, PharmD.
Table adapted from Pharmacology and Physiology for Anesthesia, Chapter 17, 291-308.
General Considerations to Reduce Pain Include:
Using buffered anesthetic
Avoiding cold/refrigerated anesthetic – allow time to warm up to room temperature
Decreasing the rate with which you infiltrate (you’re not pushing adenosine)
Special Considerations for pediatrics:
Depending on your resources, distraction with iPads, child-life specialists, etc. can help improve your success as well.
Hide the needle from view while preparing for the procedure.
Do not forget that the parent can also help with positioning and de-escalating the patient’s anxiety.
Special Considerations for Oral Blocks:
Topical lidocaine should be used prior to nerve block – this will greatly increase the patients’ comfort, their ability to remain still, and ultimately, your success.
Method 1: Ask them to swish viscous lidocaine around in their mouth for about 30 seconds, or as long as they can tolerate it.
Method 2: Soak and generously coat 1-2 cotton tipped applicators (Q-tips) or cotton pledgets with viscous or regular lidocaine and place them in the buccal mucosa at your intended target for 1-5 minutes.
The Anatomy
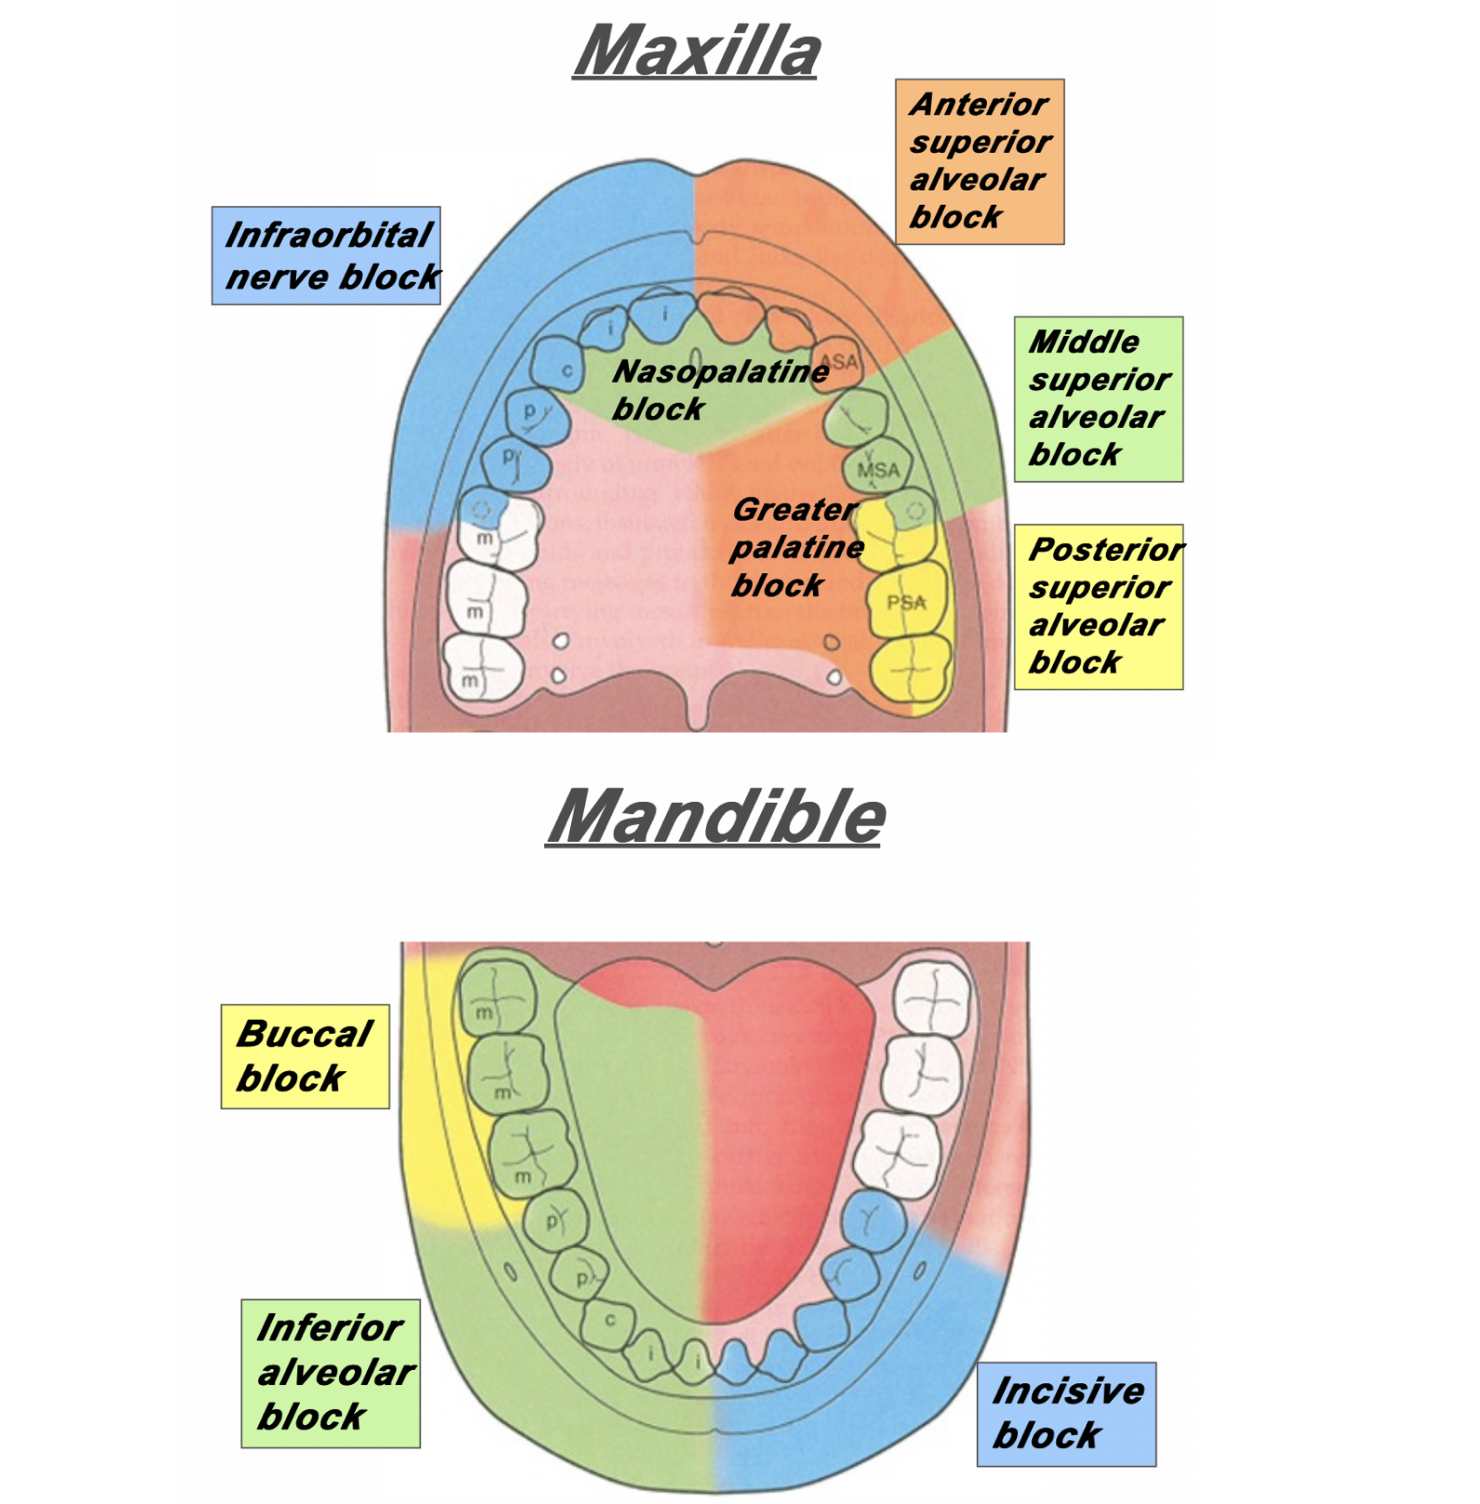
Figure 1: The area of distribution of areas innervated by different nerves of the maxilla and mandible.
Superior Alveolar Nerve Blocks
Step 1: Apply topical anesthetic as discussed earlier to make entry with the needle more comfortable.
Step 2: Retract the lip. Insert your needle through the mucobuccal fold at the at the area locations depicted in Figure 2, Figure 3 and Figure 4.
Step 3: With the bevel facing the maxilla, inject 1-3mL of anesthetic.
![Figure 2: For the posterior superior alveolar nerve, enter just posterior to the root of the second molar. [1]](https://images.squarespace-cdn.com/content/v1/549b0d5fe4b031a76584e558/1579525643429-1EWBG1XTA7ZHHJ5PSYYT/PosteriorSuperiorAlveolarBlock.png)
Figure 2: For the posterior superior alveolar nerve, enter just posterior to the root of the second molar. [1]
![Figure 3: For the middle superior alveolar nerve, enter between the first molar and second premolar. [1]](https://images.squarespace-cdn.com/content/v1/549b0d5fe4b031a76584e558/1579525901957-HQGE6VTL16IGCXYIHRTV/Screen+Shot+2020-01-20+at+7.10.54+AM.png)
Figure 3: For the middle superior alveolar nerve, enter between the first molar and second premolar. [1]
![Figure 4: For the anterior superior alveolar nerve, enter just above the canine tooth. [1]](https://images.squarespace-cdn.com/content/v1/549b0d5fe4b031a76584e558/1579527033350-0S15C2ABWP6RQIMEVBDD/AnteriorSuperiorAlveolarNerve.png)
Figure 4: For the anterior superior alveolar nerve, enter just above the canine tooth. [1]
Inferior Alveolar Nerve Block
Step 1: Apply topical anesthetic as discussed earlier to make entry with the needle more comfortable.
Step 2: Retract the lip/cheek and with the same hand, palpate the coronoid notch with your thumb.
Step 3: With your syringe, enter at an angle in which you are approaching from the contralateral incisor.
Step 4: Insert the needle about 1-2cm posterior to your thumb.
Step 5: Inject 1-3mL of local anesthetic.
![Figure 5: The approach and anatomy of the alveolar nerve block. [1]](https://images.squarespace-cdn.com/content/v1/549b0d5fe4b031a76584e558/1579196433624-MHAVFNTG93XWF0PB1K45/blogpost10.png)
Figure 5: The approach and anatomy of the alveolar nerve block. [1]
Mental Nerve Block & Infraorbital Nerve Block
Mental nerve and infraorbital nerve blocks can also be used to supply anesthesia to the mouth and oral cavity.
These can be found in Part I of our series of Nerve Blocks of the Head and Neck: [insert link].
The infraorbital block can be very useful in conjunction with a superior alveolar block for patients with extensive facial pain stemming from their dental complaints.
Please note: the mental nerve block does not supply anesthesia to the teeth – only the lips, skin and buccal tissue. For anesthesia to the bottom teeth, an inferior alveolar nerve block is recommended (Figure 1).
Expert Commentary
Thank you for this concise review of a necessary and practical skill for any Emergency Medicine provider. As you point out performing oral blocks not only can facilitate laceration repair/abscess drainage but they can also immediately relieve a patient’s pain from acute or chronic pulpitis or a developing peri-apical abscess.
Here are a couple of additional tips/points of reinforcement:
Patient positioning and lighting is key to identifying landmarks - When you are the recipient of these blocks in a dentist office you will note that they have you lying nearly completely and that they have exceptionally bright overhead lights. Trying to perform these blocks with the patient sitting upright is a literal pain in the back and not having a bright light sources means you are going mostly be feel. So, for all these patients, I recommend lying them back in the bed with the HOB at approximately 20 degrees. And, I recommend either a headlamp, swinging over an overhead light (if available), or bringing in a portable light source.
Superior Alveolar Nerve Blocks can be tough - I often find that those that are first learning dental blocks shy away from the superior alveolar nerve blocks. I, personally find them to be a bit more difficult than the inferior alveolar nerve blocks and, consequently, also find that my success rate is not as good as with inferior alveolar nerve blocks. However, when they do work, they are every bit as effective in helping your patient feel better in a dramatic way. And since you will always be better at the procedure you have done 50 times than the procedure you have done once or twice, I heartily encourage offering this to patient’s with upper dental pain. Over time I have found greater success with the procedure by ensuring that I am placing my needle and instilling my anesthetic about 1 mm above the junction of the buccal and gingival mucosa. If you try to instill into the gingival mucosa, it tends to be quite a painful injection and somewhat less effective as a block.
Talk it up, but Don’t Sell it as a Cure All - I offer dental blocks to nearly all of my patients that present with dental pain. I think it is a highly effective way to immediately take care of the patient’s pain. When you are talking to your patient’s about the procedure, let them now that they could have up to 8 hours of pain relief but that every patient is different in the way they metabolize the anesthetic and the blocks themselves will have variable effectiveness (how close did you get to the nerve, how much did you still, etc). I also let them know that there is a chance you might miss your mark and the block won’t be effective which would either necessitate a second attempt or an alternative approach to controlling their pain.

Jeffery Hill, MD, MEd
Assistant Professor of Emergency Medicine
Assistant Residency Program Director
University of Cincinnati Health
References
Ailes D, Waseem M. Regional Anesthesia (Nerve Blocks). In: Ganti L. (eds) Atlas of Emergency Medicine Procedures. Springer, New York, NY. 2016.
Cepeda MS, Tzortzopoulou A, Thackrey M, Hudcova J, Arora Gandhi P, Schumann R. Adjusting the pH of lidocaine for reducing pain on injection. Cochrane Database Syst Rev. 2010 Dec 8;(12).
Hollander JE, Camacho, M. Assessment and management of facial lacerations. Stack AM, Wolfson AB, ed. UpToDate. Waltham, MA: UpToDate Inc. https://www.uptodate.com (Accessed on March 20, 2019.)
Hsu DC. Clinical use of topical anesthetics in children. Stack AM, Wiley JF, ed. UpToDate. Waltham, MA: UpToDate Inc. https://www.uptodate.com (Accessed on March 20, 2019.)
Jeng CL, Rosenblatt MA. Overview of peripheral nerve blocks. Maniker R, Crowley M, ed. UpToDate. Waltham, MA: UpToDate Inc. https://www.uptodate.com (Accessed on March 20, 2019.)
Spangler RM, Abraham MK. Regional Anesthesia of the Head and Neck. In: Roberts and Hedges’ Clinical Procedures in Emergency Medicine and Acute Care. Elsevier Inc, Philedelphia, PA. 2019: Chapter 30, 545-559.
Suzuki S, Koköfer A, Gerner G. Local Anesthetics. In Hemmings HC & Egan TD, eds. Pharmacology and physiology for anesthesia: foundations and clinical application, 1st ed. Saunders, Philedelphia, PA. 2013: 291-308.
All images were obtained from:
[1] Spangler RM, Abraham MK. Regional Anesthesia of the Head and Neck. In: Roberts and Hedges’ Clinical Procedures in Emergency Medicine and Acute Care. Elsevier Inc, Philedelphia, PA. 2019: Chapter 30, 545-559.
How to Cite This Post
[Peer-Reviewed, Web Publication] Karalius V, Cunningham, A. (2020, Jan 20). Oral Nerve Blocks. [NUEM Blog. Expert Commentary by Friedman, B]. Retrieved from http://www.nuemblog.com/blog/oralnerveblock


![Figure 1: Sonographic view of trachea showing air-mucosa interface with posterior reverberation and shadowing artifact. [Photo courtesy of John Bailitz, MD]](https://images.squarespace-cdn.com/content/v1/549b0d5fe4b031a76584e558/1572626234251-VL5QSV3R6S608OO7J8OI/1.+Figure+1+-+Trachea.png)
![Figure 2: Clip demonstrating the bullet sign: a single air-mucosa interface with increased posterior shadowing and artifact indicates the trachea has been intubated. [Photo courtesy of John Bailitz, MD]](https://images.squarespace-cdn.com/content/v1/549b0d5fe4b031a76584e558/1572626261525-86AN0IKGCSGN5EHY11VN/image-asset.gif)
![Figure 3: Clip demonstrating the double tract sign: the appearance of a second air-mucosa interface with posterior artifact adjacent to the trachea indicates the esophagus has been intubated. [Photo courtesy of John Bailitz, MD]](https://images.squarespace-cdn.com/content/v1/549b0d5fe4b031a76584e558/1572626372841-E4OFNNGZHEOI7ECDRIJP/3.+Figure+3+-+Double+Tract+Sign.gif)


![Figure 1: Bruising patterns that suggest child abuse. [6]](https://images.squarespace-cdn.com/content/v1/549b0d5fe4b031a76584e558/1570459114532-IVTA7KT3PX1J6DGC3U3L/Figure+1%3A+Patterns+of+Bruising)
![Figure 2: Forced immersion burn of buttocks with bilateral, symmetric leg involvement in a “stocking” pattern. [7]](https://images.squarespace-cdn.com/content/v1/549b0d5fe4b031a76584e558/1570459322548-EFHGSFQ962QP9FU5DNJN/Figure+2%3A+Burn+patterns+that+suggest+non-accidental+trauma)
![Figure 3: Classic metaphyseal lesion. White arrows denote femoral metaphyseal separation and black arrow denotes a proximal tibial lesion or “bucket handle.” [1]](https://images.squarespace-cdn.com/content/v1/549b0d5fe4b031a76584e558/1570459580501-8461RMF0P9706GJW7XJU/Figure+3%3A+Fractures+of+NAT)
![Figure 4: Posterior and lateral rib fractures of differing ages indicative of NAT [4]](https://images.squarespace-cdn.com/content/v1/549b0d5fe4b031a76584e558/1570460464292-4QFTGMDQAB64NQBSYD9N/Figure+4%3A++Rib+fractures+of+differing+ages+indicative+of+NAT)
![Figure 5: Fundus of child with AHT with too-numerous-to-count retinal hemorrhages indicated by the black arrows. [8] The white arrow indicates small pre-retinal hemorrhages. The white arrowhead denotes hemorrhage extending into the peripheral retina…](https://images.squarespace-cdn.com/content/v1/549b0d5fe4b031a76584e558/1570460641270-3V7M52RMMV1QDMZ3PA1S/Figure+5%3A+Occular+manifestations)
![Figure 6: Elements of the Skeletal Survey. Although a full skeletal survey is currently the standard of care for patients with NAT, there are ongoing research efforts to tailor X-ray imaging more specifically to each patient. [1]](https://images.squarespace-cdn.com/content/v1/549b0d5fe4b031a76584e558/1570461092995-EBKSMB5DI0GTGXY0R75N/Figure+6%3A+Skeletal+surgery)


![Image from: Scott Weingart. Podcast 060 – On Human Bondage and the Art of the Chemical Takedown. EMCrit Blog. Published on November 13, 2011. Accessed on March 8th 2019. Available at [https://emcrit.org/emcrit/human-bondage-chemical-takedown/ ].](https://images.squarespace-cdn.com/content/v1/549b0d5fe4b031a76584e558/1567388477962-KRXLKHZYC5XNCEGD8VRQ/image-asset.jpeg)
