Posts tagged #hand injury

Hand Nerve Blocks

Written by: Aldo Gonzalez, MD (NUEM ‘23) Edited by: Jason Chodakowski, MD (NUEM '20)
Expert Commentary by: Mike Macias, MD


Hand Nerve Blocks

Nerve blocks are the use of anesthetics to anesthetize an area by injecting directly around the nerve that innervates a certain area. It is useful when there is a large area to provide anesthesia, the area might get distorted by local infiltration and make it difficult to close the tissue, or the distribution of the area to be anesthetized is well-suited to a nerve block.

Indications

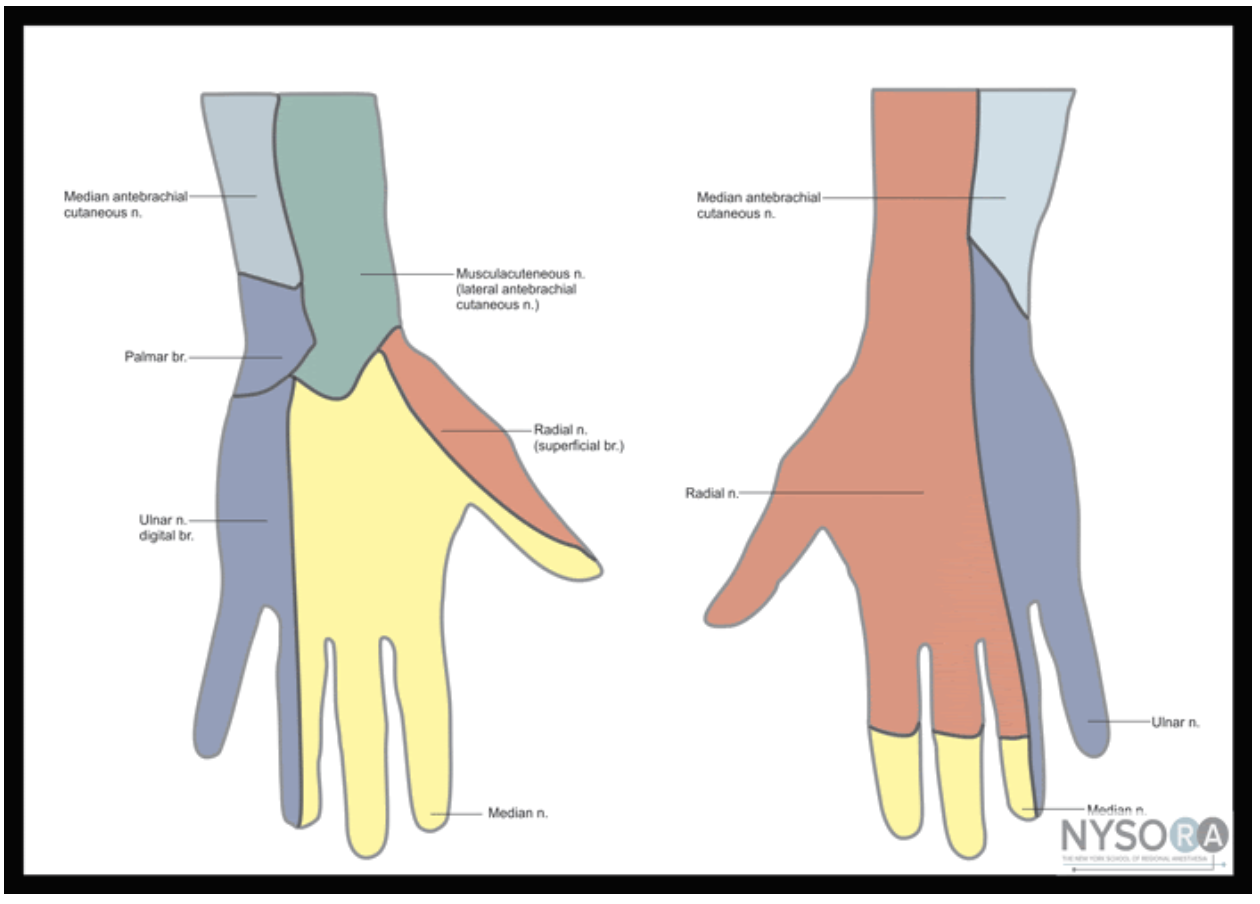
Nerve blocks of the median, ulnar, radial, and digital nerves are useful for injuries of the hand including fractures, lacerations, and burns.

Contraindication

  • Overlying infection

  • Previous allergic reaction to anesthetic

 Anesthetics

Landmark versus Ultrasound guidance

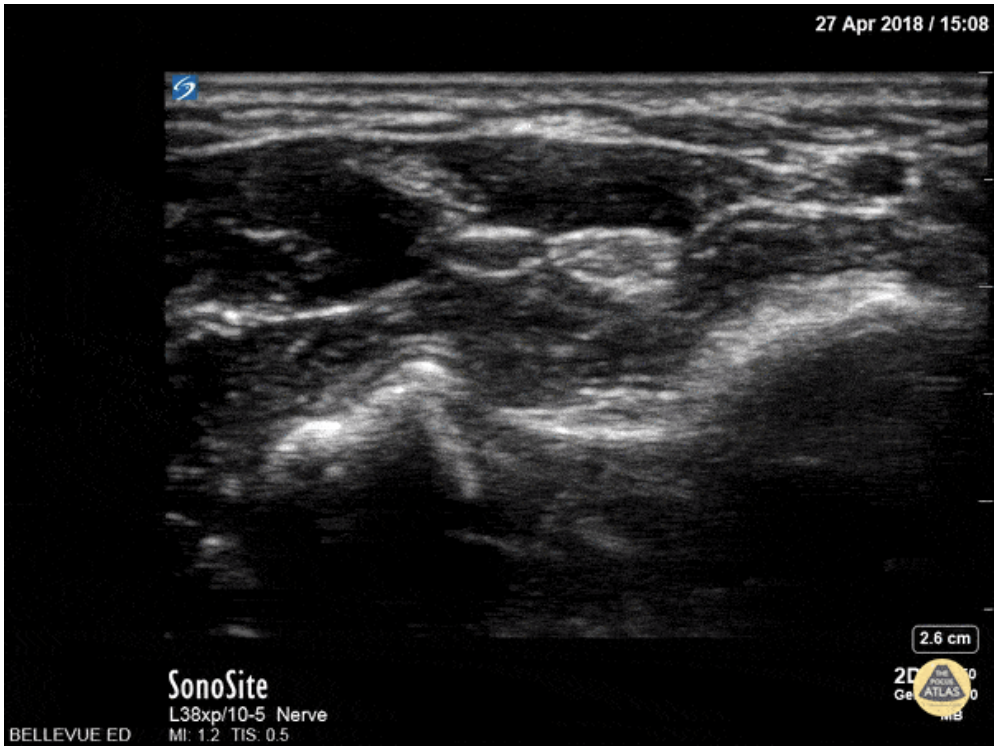
Ultrasound guidance is preferred given the ability to visualize the desired nerve and proper instillation of the anesthetic around the nerve. On ultrasound nerves are circular or triangular hyperechoic structures with hypoechoic structures within. Often described as having a “honeycomb” appearance as seen in the image of the median nerve below.

Materials

  • Ultrasound with Linear Transducer

  • Probe Cover

  • Sterile Ultrasound Gel

  • Anesthetic

  • 10 cc syringe

  • 18 gauge needle (to draw medication)

  • 25-27 gauge needle at least 1.5 in in length

  • Antiseptic Solution (ex. Chlorhexidine)

  • Towel

Positioning

The patient can be either supine or seated with their arm slightly abducted and rested on a flat surface. Their elbow can be flexed with the wrist supinated and in slight extension. A rolled towel can be used for patient comfort and help in maintaining slight extension.

Figure 1: Nerves, arteries, and muscles of the human forearm

Radial Nerve Block

The superficial radial nerve travels between the flexor carpi radialis and the radial artery on anterior (volar) and lateral (radial) aspect of the forearm. Near the wrist the radial nerve splits into the medial and lateral branch of the superficial radial nerve. The block of this nerve should be performed at the mid-forearm to distal third of the forearm before the nerve splits. The nerve may be difficult to see at the distal forearm so instead it can be found proximally and followed distally. A lateral (radial) approach of the forearm provides the most direct route to the nerve.

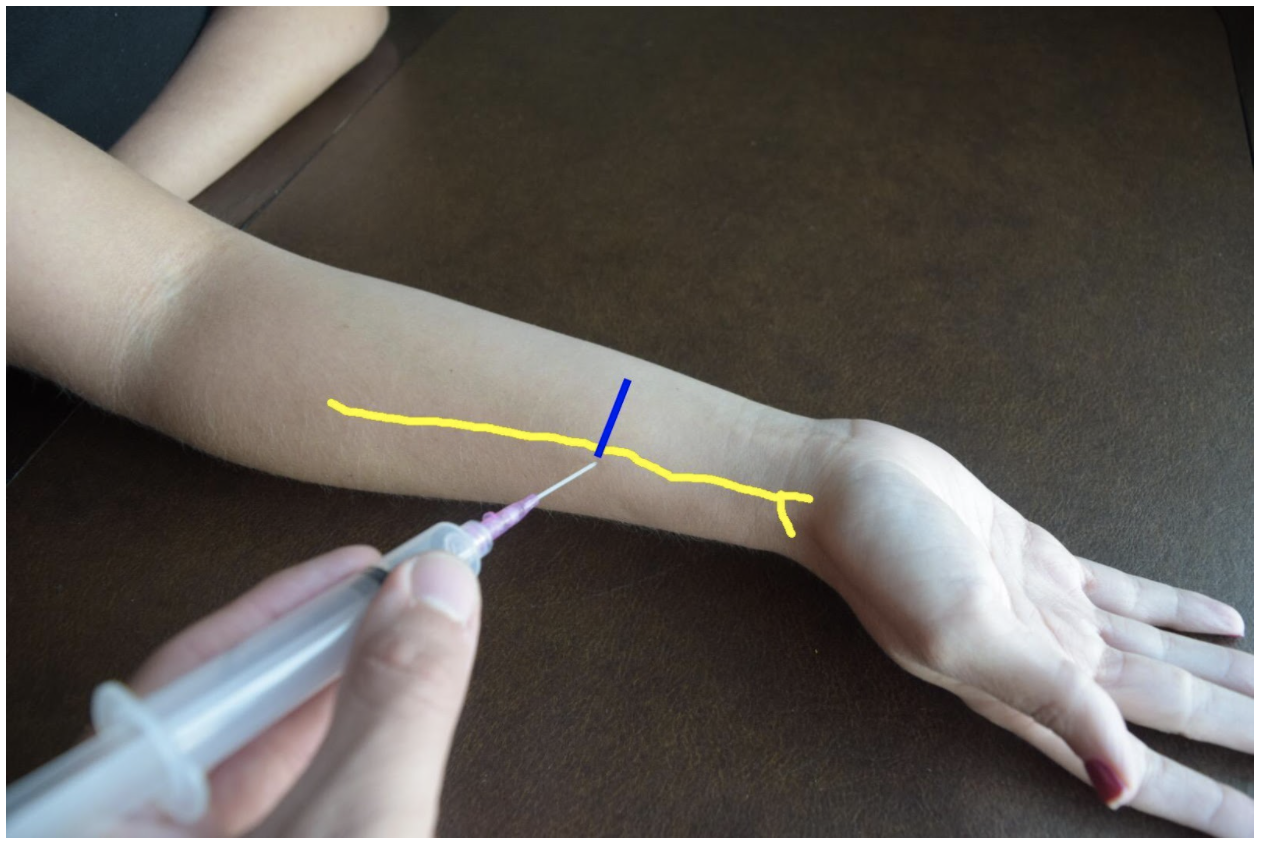
Figure 2: Demonstration of a radial nerve block using a lateral (radial) approach with in-plane ultrasound technique on a patient’s right hand. Radial nerve (yellow line) and ultrasound probe location (blue line).

Ulnar Nerve Block

At the distal forearm the ulnar nerve runs on the medial (ulnar) and anterior (volar) aspect of the forearm between the flexor carpi ulnaris tendon and the ulnar artery. The ulnar nerve lies in very close proximity to the ulnar artery in the distal forearm and increases the risk of accidental intravascular injection. It is safer to identify the ulnar nerve distally and the follow the artery and nerve proximally. Around the proximal third of the forearm the ulnar artery dives deeper and separates from the ulnar nerve. This provides a safer target. A medial (ulnar) approach of the forearm provides the most direct route to the nerve.

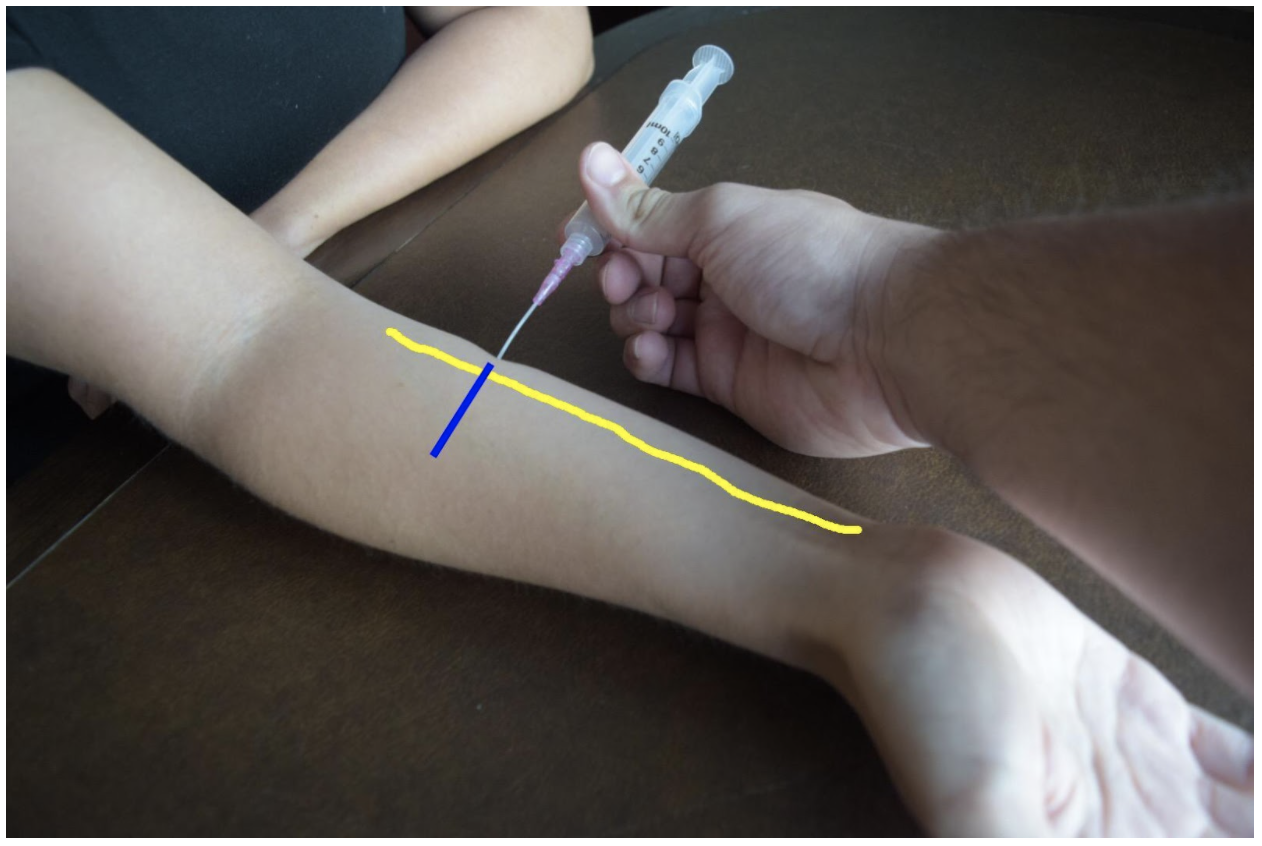
Figure 3: Demonstration of an ulnar nerve block using a median (radial) approach with in-plane ultrasound technique on a patient’s right hand. Ulnar nerve (yellow line) and ultrasound probe location (blue line).

Median Nerve Block

At the mid to distal forearm the median nerve runs in the middle of the anterior (volar) aspect of the forearm between the flexor digitorum superficialis and flexor digitorum profundus muscles/tendons. Near the wrist the nerve can be difficult to appreciate due to all the tendons of the anterior compartment of the arm. The nerve can be best appreciated at the mid-forearm. A lateral (radial) or medial (ulnar) approach can be used for in-plane technique or a mid-line approach using out-of-plane technique. Be mindful to avoid accidentally puncturing the radial or ulnar artery If using an in-plane technique with a lateral or medial approach.

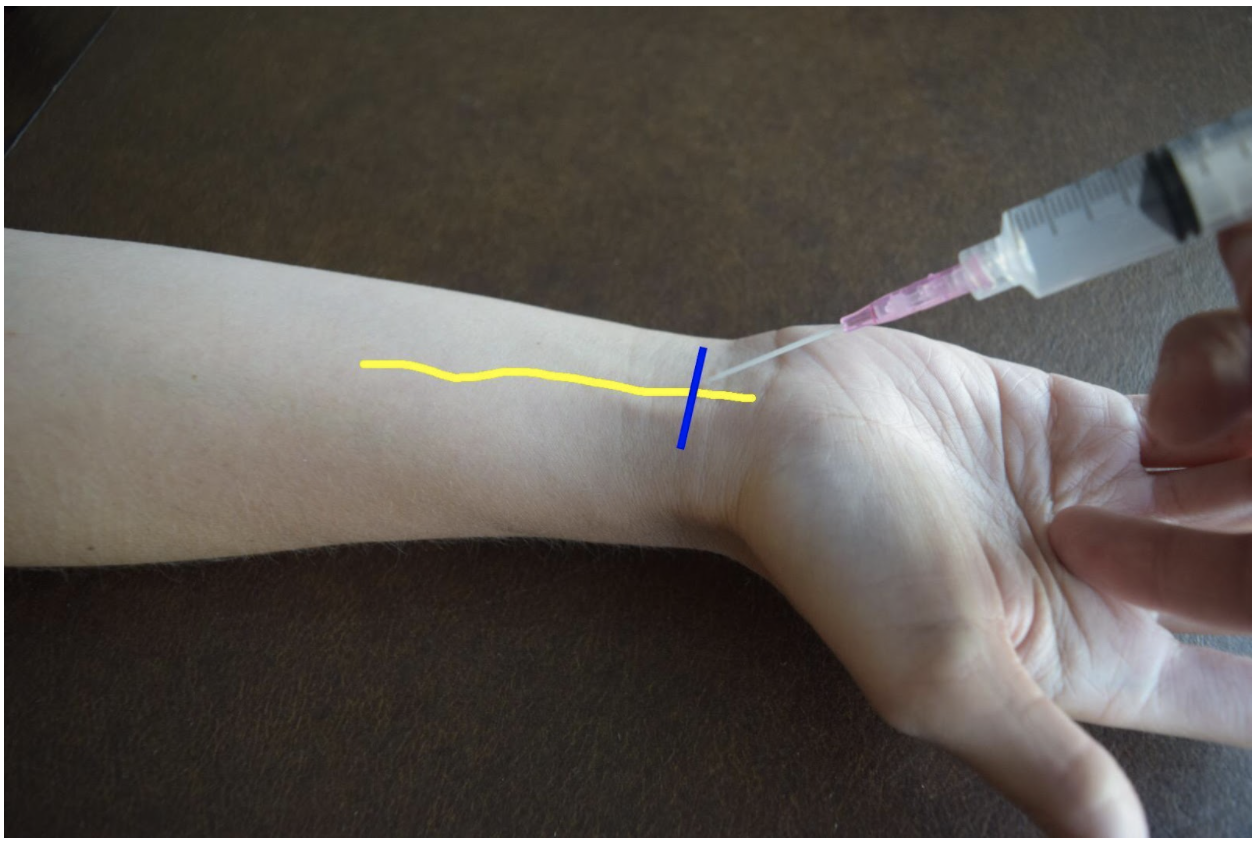
Figure 4: Demonstration of a median nerve block using a midline approach with out-of-plane ultrasound technique on a patient’s right hand. Median nerve (yellow line) and ultrasound probe location (blue line).

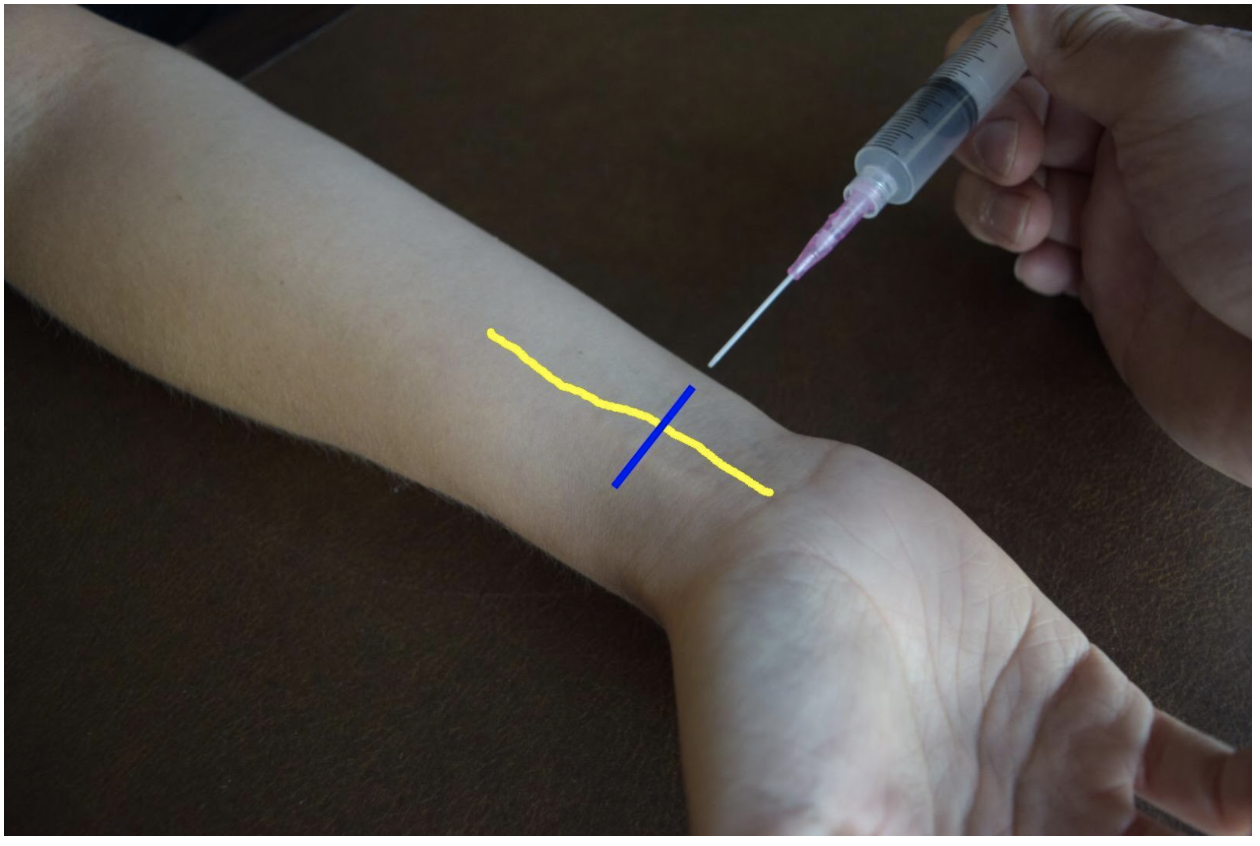
Figure 5: Demonstration of a median nerve block using a median (ulnar) approach with in-plane ultrasound technique on a patient’s right hand. Median nerve (yellow line) and ultrasound probe location (blue line).

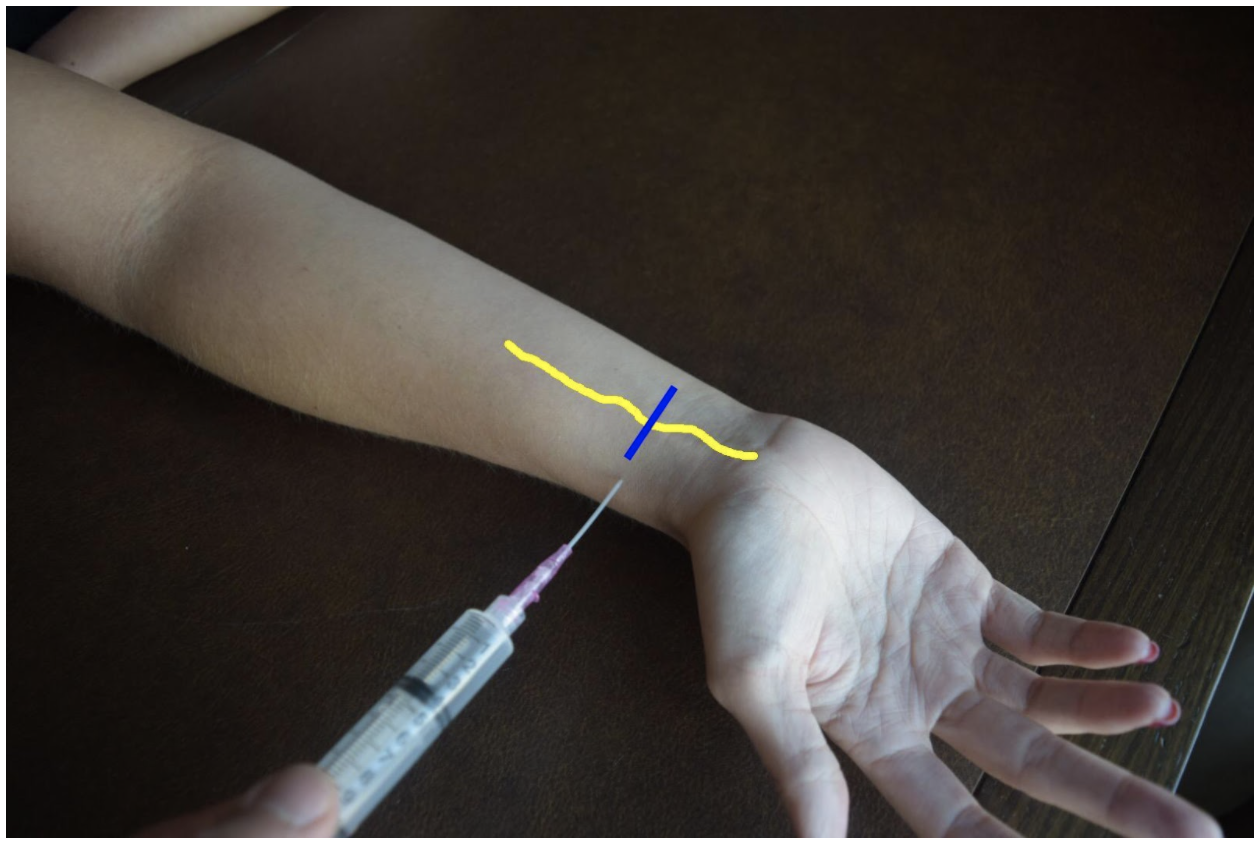
Figure 6: Demonstration of a median nerve block using a lateral (radial) approach with in-plane ultrasound technique on a patient’s right hand. Median nerve (yellow line) and ultrasound probe location (blue line).

Steps for Ultrasound-Guided Nerve Block

  1. Document a neurological exam prior starting the procedure

  2. Select the nerve or nerves best suited to achieve best anesthesia for the injury

  3. Use the linear transducer to visualize the nerve prior beginning the procedure

  4. Plan an approach and select the best site

  5. Draw up anesthetic in the 10 cc syringe with an 18 G needle

  6. Replace 18 G needle with 25-27 G needle

  7. Use antiseptic solution to prepare the skin

  8. Dawn sterile gloves

  9. Cover transducer in sterile cover

  10. Use ultrasound to visualize the nerve and confirm approach

  11. Insert the needle into the skin

  12. Advance the needle using in-plane or out-of-plane technique 

  13. Come close to the nerve but do not puncture the nerve

  14. Draw back to confirm not with-in a vessel

  15. Deliver 5mL of anesthetic

  16. The nerve will become enveloped in hypoechoic anesthetic and peel away from the fascia of nearby muscles

  17. Withdraw the needle.

  18. Wait 3-5 minutes until patient is fully anesthetized

References

  1. Drake, R., Vogl, A. W., & Mitchell, A. W. (2015). Gray's Anatomy for Students (3rd ed.): Elsevier.

  2. Farag, E., Mounir-Soliman, L., & Brown, D. L. (2017). Brown’s Atlas of Regional Anesthesia (5th ed.): Elsevier.

  3. Gray, H. (2000). Gray's Anatomy of the Human Body. 20th edition. Retrieved from https://www.bartleby.com/107/

  4. Harmon, D., Barrett, J., Loughnane, F., Finucane, B. T., & Shorten, G. (2010). Peripheral Nerve Blocks and Peri-Operative Pain Relief (2nd ed.): Elsevier.

  5. Pester, J. M., & Varacallo, M. (2019). Ulnar Nerve Block Techniques. In StatPearls [Internet]: StatPearls Publishing.

  6. Roberts, J. R., Custalow, C. B., & Thomsen, T. W. (2019). Roberts and Hedges' clinical procedures in emergency medicine and acute care (7th ed.): Elsevier.

  7. Waldman, S. D. (2016). Atlas of Pain Management Injection Techniques E-Book (4th ed.): Elsevier.

  8. Waldman, S. D. (2021). Atlas of Interventional Pain Management E-Book (5th ed.): Elsevier.


Expert Commentary

Thank you Drs. Gonzalez and Chodakowski for the excellent post on forearm nerve blocks! This is an important skill that definitely improves the care of our patients, especially since hand injuries are such a common emergency department presentation. This is especially true for injuries that are difficult to anesthetize using traditional local injection such as dog bites, burns, abscesses, large lacerations, and fractures of the hand. I’d like to dive a little deeper into a few aspects of forearm nerve blocks:

Ultrasound guidance

I think that the days of a landmark based approach to the majority of nerve blocks are gone with the widespread availability of ultrasound and its superiority with respect to block success and reduced complications. So if you have it, use it! 

Which nerve to block?

Once you have made the commitment to block one forearm nerve, it doesn’t require much additional time or effort to block a second or even a third! Often, hand injuries will span several nerve distributions so make sure you are providing adequate anesthesia. Here is a quick way to think of it: 

  • Major hand injury (ie burn, multiple hand fractures): Triple block 

  • Injury to radial aspect of hand or digits 1-4: Radial + median nerve block 

  • Injury to ulnar aspect of hand or 5th digit (ie Boxer’s fracture): Ulnar nerve block

It is important to remember that forearm nerve blocks do not provide anesthesia to the volar forearm or wrist and therefore will not be adequate for distal radius fracture reduction. In this case, an above the elbow Radial nerve block should be performed. 

Which local anesthetic should I use?

It’s always important to consider what the goals of your local anesthetic are when determining which one to use. If you are performing a quick procedure, the shorter the better such as lidocaine. If you are providing prolonged pain management such as with a burn, bupivicaine is a better choice. I tend to prefer lidocaine + epinephrine (duration of acton 2-2.5 hours) for most of my hand injuries. Why? In a busy emergency department managing many patients at a time, the initial block and the procedure you plan on performing (ie lac repair, fracture reduction, etc) do not always happen simultaneously (ie patient may still need x-ray, irrigation, ring removal, etc). Using lidocaine + epinephrine will allow you to provide immediate pain relief for your patient but give you time to do other tasks before the patient is ready for the procedure

Positioning

As with any procedure, the set up is extremely important. You nicely described positioning earlier but I just want to highlight a couple additional points. Make sure your patient is comfortable and your ultrasound screen is in-line with your procedure. You don’t want to be turning your head away from your block to look at the screen. For the median and radial nerve block, the patient’s arm should be supinated and resting on a hard flat surface. Both nerves can then be approached using an in-plane technique from the radial aspect of the arm. The ulnar nerve can be cumbersome to get to with this same patient positioning so I recommend abducting the shoulder to about 90 degrees and placing the arm on a Mayo stand next to the patient. This will allow an in-plane approach from the ulnar aspect of the arm. I have also found this positioning technique helpful for the ulnar nerve block. 

Procedural Tips

I wanted to end with a couple of important procedural pearls I have learned during my experience with performing these blocks:

  • Perform a pre-block exam! Always make sure to perform and document a full neurological exam of the hand before you block any nerve. This is important because you want to make sure you know if any sensory or motor changes are present before your perform the block otherwise if a neurological deficit is noted after, it makes it difficult to tell if the block caused the new symptom (you can always wait until the anesthetic wears off but it may be awhile if you used bupivicaine). 

  • Follow the arteries! Sometimes it can be tricky to find the ulnar and radial nerves. The easiest method is to always start distally at the wrist. Both the radial and ulnar nerves run with their paired artery so if you start here and slide proximally, you should see the nerve split away from the artery around the mid forearm. Block them here! 

  • Target the fascial plane! The key to an effective forearm nerve block is “bathing” the nerve in anesthetic. You will want to see spread of the anesthetic around the nerve in a crescent shape, full circumferential spread is not needed. Since these nerves run in the fascial plane the goal is to get your needle tip into this plane to deposit anesthetic. There is never a need to actually touch the nerve so avoid this by aiming for the fascia and not the nerve. 

  • Protect the hand! After you perform a forearm nerve block be sure to communicate with nursing, consultants, and the patient regarding what block was performed and how long the effects will last. If a long acting agent was used such as bupivicaine, the hand should be splinted or arm placed in a sling and instructions provided to patient regarding care at home if they are being discharged. 


Thank you again for providing this excellent piece on forearm nerve blocks. I cannot stress enough how essential I think these blocks are to the toolkit of the modern emergency physician. I promise you once you add these to your practice your patient’s will thank you!

Michael Macias, MD

Global Ultrasound Director, Emergent Medical Associates 

Clinical Ultrasound Director, SoCal MEC Residency Programs


How To Cite This Post:

[Peer-Reviewed, Web Publication] Gonzalez, A. Chodakowski, J. (2021, Nov 29). Hand Nerve Blocks. [NUEM Blog. Expert Commentary by Macias, M]. Retrieved from http://www.nuemblog.com/blog/hand-nerve-blocks


Other Posts You May Enjoy

Posted on November 29, 2021 and filed under Procedures.

Can't Miss Hand and Wrist Fractures in the ED

Ortho-fx.png

Written by: Justine Ko, MD (NUEM PGY-3) Edited by: Spenser Lang MD (NUEM Alum ‘18 ) Expert commentary by: Matt Levine, MD


“Can’t Miss” Hand and Wrist Injuries in the ED

In the emergency department, orthopedic complaints make up a large percentage of presentations, up to 50% in the pediatric population and close to 33% in the adolescent and young adult population. Many of these injuries are uncomplicated, but an astute clinician can diagnose subtle and uncommon injury patterns. Three less common injuries are reviewed here. If found, these injuries can alter the management and disposition of the patient. Each of these injuries should be carefully assessed for on physical exam and imaging. 

DISTAL RADIOULNAR JOINT (DRUJ) INJURIES

What exactly is the distal radioulnar joint and why is it important?

The distal radioulnar joint (DRUJ) consists of both the bony radioulnar articulation as well as the soft tissue components, including ligaments. It has significant contributions to the axial load-bearing capabilities of the forearm. The injury can be an isolated injury or associated with forearm fractures and should be tested for with every forearm injury as its presence can alter the disposition and even functionality of the patient. 

unnamed-2.jpg

When does it occur?

A DRUJ injury may occur, although rarely, in isolation. This is usually related to a fall on outstretched hand (FOOSH). A DRUJ injury is more often associated with a fracture. Common associations include: 

  • Distal radial fracture (DRF)

    • DRF + DRUJ = Galeazzi fracture (pictured to the right)

  • Ulnar styloid fracture 

How should I assess for a possible DRUJ injury?

unnamed-4.jpg
  • Routine AP and lateral views are poor for determining a DRUJ injury. This is largely a CLINICAL DIAGNOSIS.

  • Piano Key Sign: with the patient’s hand in pronation, push on the dorsal aspect of the ulnar head. Depression and rebound of the ulnar head suggest DRUJ instability

  • Table Top Test: have patient place hands on a table and apply force. A DRUJ injury will show dorsal depression of the ulna

  • Grind Test: hyperextend the wrist and axial load the forearm. A positive sign elicits pain over the joint 

How does this alter management?

When associated with a fracture, operative management is often indicated and consultation with our orthopedist is warranted. When missed, a DRUJ injury will result in instability of the joint and arthrosis. 

PERILUNATE AND LUNATE DISLOCATIONS

unnamed-8.png

It has been reported that these injuries are missed in up to 25% of ED presentations.

How do these injuries occur?

In perilunate and lunate dislocations, the mechanism is usually hyperextension in the setting of trauma. Patients presents with hand and wrist pain/swelling.

How do I distinguish perilunate from lunate dislocations?

unnamed-12.png

Lunate and perilunate dislocations can be easily confused or mistaken for each other. The key to distinguishing these injuries on imaging is the alignment between the metacarpal, carpal, and the radius/ulna bones.

In a normal lateral x-ray, these bones should all align (Figure 1, far left). In a lunate dislocation, the lunate itself is physically removed or out of line with the rest of these bones (Figure 1, far right), resulting in the classic “spilled teacup” appearance on x-ray. In a perilunate dislocation, the lunate sits in line with the radius/ulna, however the capitate/metatarsal bones are dislocated dorsally. 

On an AP film, a break in Gilula’s arc/lines may be used to assess for a perilunate or lunate dislocation (Figure 2).

How Are These Injuries Treated?

In the ED, closed reduction can be attempted. If successful, definitive treatment can occur up to 7 days later. If unsuccessful, operative management is indicated. Definitive treatment involves open reduction and internal fixation. 

How Would I Reduce These Injuries in the ED?

Usually, the assistance of our orthopaedic colleagues is warranted. Finger traps can be used for traction. The wrist should be extended while placing palmar pressure on the lunate. Then, with continued traction, the wrist should be gradually flexed so that the capitate falls back into place within the concavity of the lunate. Once the lunocapitate joint is reduced, the wrist can be extended in traction again for full reduction.

SCAPHOLUNATE DISSOCIATION

What is a scapholunate dissociation?

Scapholunate dissociation is caused by injury to the scapholunate ligament. Injury to this ligament can occur with acute FOOSH injury or be caused by degenerative rupture of the ligament. 

unnamed-10.jpg

How do I diagnosis it?

These patients present with radial wrist pain. On imaging, the following signs can aid in diagnosis. 

unnamed-6.png
  • Terry Thomas sign: This is seen on an AP wrist film and is indicated by a gap >3mm between the scaphoid and lunate bones 

  • Cortical Ring sign: occurs when the scaphoid is in a flexed position, making the scaphoid tubercle more prominent. A measure distance less than 7mm between the end of the cortical ring and the proximal end of the scaphoid suggests scapholunate dissociation and instability.  

How do I manage it?

In the ED, patients should be placed in a thumb spica cast for stabilization and referred to orthopaedics for follow up. Operative indication includes injury within 3 weeks and associated imaging and physical exam findings. During this time frame, the SL ligament is still viable for repair. 


Expert Commentary

Great choice by Dr. Ko to highlight these injuries that are often subtle, yet important because of the comorbidities associated with missing the diagnosis. 

The Galeazzi fracture is a classic EM boards question, because it is important!  It was termed by Campbell as the “fracture of necessity” (modern day translation = “this needs surgery!”) in 1942 because nonoperative management was observed to be associated with recurrent ulna styloid dislocations.  Hughston confirmed this is 1957, reporting that 35/38 cases treated nonoperatively had unsatisfactory outcomes.

There’s a saying in orthopedics that “the most commonly missed injury is the second injury”.  The radial shaft fracture is usually obvious and can distract the clinician from the less dramatic DRUJ injury.  DRUJ injury is radiographically diagnosed by:

  • Fracture at the BASE of the ulna styloid process (not the tip)

  • A widened DRUJ (a comparison x ray may be necessary), or

  • >5mm of shortening of the radius relative to the distal ulna.

A subtle clinical finding often associated with the Galeazzi fracture is anterior interosseus nerve injury.  It is a branch of the median nerve and is purely motor, so there will be no sensory deficit or paresthesia!  It manifests as loss of pinch strength between the thumb and index finger.  So have the patient make the OK sign and resist as you try to open it!

Mayfield, Johnson and Kilcoyne described a pattern of carpal injury caused by wrist hyperextension, ulnar deviation and intercarpal supination in 1980. In their original research on cadavers, progressive hyperextension force was applied and resulted in a consistent, sequential, progressively more unstable intercarpal injury pattern known as the four stages of carpal instability:

  1. Scapholunate dissociation

  2. Perilunate dislocation

  3. Perilunate and triquetral dislocation

  4. Lunate dislocation

Acute scapholunate dissociation is the most common pattern of carpal instability. It occurs secondary to a tear of the scapholunate interosseus ligament.  Scapholunate dissociation can also be chronic secondary to arthritic changes when there is no history of recent trauma.

X rays in lunate and perilunate dislocations are often not as clear and obvious as the diagrams used to teach these injuries.  The key to realizing that there is a carpal bone dislocation is recognizing that the carpal arcs are disrupted on the AP view. The distal and proximal carpal rows should never overlap on this view.  If you recognize this, you will heighten your suspicion and won’t miss these injuries, even if you cannot immediately tell the exact diagnosis.  

The name perilunate dislocation has always been a pet peeve of mine. There is no perilunate bone, so this nomenclature just introduces confusion.  It should simply be called a capitate dislocation, because that it what it really is.

All of these injuries, and more, are further detailed in our Ortho Teaching Files!

Picture1.png
 

Matthew R. Levine, MD

Assistant Professor

Department of Emergency Medicine

Northwestern University


How to Cite this Post

[Peer-Reviewed, Web Publication] Ko J, Lang S. (2019, Aug 19). Can't Miss Hand and Wrist Fractures in the ED. [NUEM Blog. Expert Commentary by Levine M]. Retrieved from http://www.nuemblog.com/blog/cant-miss-hand-and-wrist-fractures-in-the-ed/.


Other Posts You Might Enjoy

To learn more about the diagnosis and management of orthopedic injuries from head to toe, check out our Ortho Teaching Files!


References

  1. Bowen WT, Slaven EM. 2014. “Evidence-based management of acute hand injuries in the emergency department.” Emergency Medicine Practice 16 (12):1-28. 

  2. “Distal Radial Ulnar Joint (DRUJ) Injuries - Trauma - Orthobullets.” n.d. Accessed March 7, 2018. https://www.orthobullets.com/trauma/1028/distal-radial-ulnar-joint-druj-injuries.

  3. Kardashian G, CHristoforou DC, Lee SK. 2011. “Perilunate dislocations.” Bulletin of the NYU Hospital for Joint Diseases 69 (1):87-96.

  4. “Lunate Dislocation (Perilunate Dissociation) - Hand - Orthobullets.” n.d. Accessed March 2, 2018. https://www.orthobullets.com/hand/6045/lunate-dislocation-perilunate-dissociation.

  5. Pappou, Ioannis P., Jennifer Basel, and D. Nicole Deal. 2013. “Scapholunate Ligament Injuries: A Review of Current Concepts.” Hand (New York, N.Y.) 8 (2): 146–56. https://doi.org/10.1007/s11552-013-9499-4.

  6. Reisler T, Therattil PJ, Lee ES. 2015 “Perilunate Dislocation.” Eplasty

  7. Rodner CM, Weiss APC. “Acute scapholunate and lunotriquetral dissociation.” American Society for Surgery of the Hand. 155-171.

  8. Scalcione LR, Gimber LH, Ho AM, Johnston SS, Sheppard JE, Taijanovic MS. 2014. “Spectrum of carpal dislocations and fracture-dislocations: imaging and management.” AJR 203: 541-550.

  9. Thomas, Binu P, and Raveendran Sreekanth. 2012. “Distal Radioulnar Joint Injuries.” Indian Journal of Orthopaedics 46 (5): 493–504. https://doi.org/10.4103/0019-5413.101031.

Posted on August 19, 2019 and filed under Orthopedics.

Demystifying the Hand Exam

Screen Shot 2018-03-05 at 8.31.59 AM (1).png

Written by: Terese Whipple, MD (NUEM PGY-2) Edited by: Victor Gappmaier, MD, (NUEM PGY-4) Expert commentary by:  Aviram Gialdi, MD, MS


The human hand is a fascinatingly intricate arrangement of pulleys, tendons, muscles, and nerves that work together in a complex system to perform daily tasks. It is often difficult to visualize the various paths that the tendons and muscles take.  It can also make a thorough hand exam difficult to perform with proficiency. This post will review the clinically relevant anatomy of the hand, and apply it to both a screening exam and detailed exam with maneuvers used in the diagnosis of common hand injuries.


This screening exam can be used in the case of a fracture/dislocation at or proximal to the wrist, or in a general trauma to ensure that there has not been a nerve injury – from the cervical spine, through the brachial plexus, and into the extremity.

Basic Screening Exam:  

Vascular

To examine the vascular supply of the hand the examiner should palpate the radial pulse and check digital capillary refill.  Using a finger pulse oximeter is a useful adjunct for evaluating perfusion; anything below 95 in a traumatized limb/digit raises concern.

Neuro

The radial, median, and ulnar nerves each have sensory and motor functions that should be evaluated. 

 Radial (C5-C8):

Img 1. Sensory innervation of hand

  • Motor: Extend the wrist. If too painful due to injury, then extension of the thumb IP joint may be substituted.
  • Sensory: Test the dorsal webspace between the thumb and index finger

Median (C5-T1):

  • Motor:
    •  Recurrent motor branch of the median nerve: Have the patient attempt opposition (bringing the thumb tip across to the small finger tip)
    • Anterior interosseus branch of the median nerve:  Make an OK sign by having the patient touch the tip of the thumb to the tip of the index finger

Img 2. Correct OK Sign

Img 3. Incorrect OK Sign

  •  Sensory: Palmar surface of the index finger or thumb

Ulnar (C8-T1):

  • Motor: Test by having patient spread fingers against resistance
  • Sensory: Palmar aspect of the little finger


Check the individual digital sensory nerves to any finger by testing the radial and ulnar sides of each digit

If the patient can perform each of the above functions and has intact sensation, as well as good cap refill and pulses, they have passed the basic screening exam and are “neurovascularly intact.”


Now for a more detailed exam, which should be used when a patient comes in with a specific hand complaint or if there is concern for muscle or tendon injury.

A thorough musculoskeletal (MSK) exam should include:

  • Inspection
  • Palpation
  • Range of Motion (ROM)
  • Nerve/Vascular assessment
  • Muscle/tendon exam
  • Specific maneuvers


Detailed Hand Exam:

Inspection

Inspect the hand for evidence of:

Img 3. Mallet finger

  • Asymmetry
  • Lacerations/abrasions: Any skin break over a joint (eg : fight bite) may look innocent, but actually provides a route for inoculation of the joint with infection and can be serious.
  • Inflammation:  Can be acute from recent injury/infection or chronic from inflammatory states such as RA.
  • Atrophy: Think critically about the location of the atrophy, is it diffuse or does it fit one nerve distribution? For example, carpal tunnel syndrome may produce atrophy in the thenar muscles supplied by the median nerve. Ulnar nerve entrapment at the elbow (Cubital tunnel syndrome) could cause hypothenar muscle wasting and intrinsic wasting (most visible at first dorsal interosseous, along dorsal radial border of the index metacarpal).
  • Any evidence of traumatic deformity such as unusual angulation or rotation. You should always check alignment of the fingers in flexion and extension. Sometimes abnormal rotation will only be visible when making a fist, when one finger crosses over/under the next
    • Any alteration to the normal cascade of the fingers (one finger that is not flexed/extended to match the position of the others) may represent a tendon injury
    • Mallet finger: A flexed DIP with inability to actively extend due to rupture of the terminal extensor tendon of the digit. (Img. 3)
    • Boxer’s fracture: May have a “dropped knuckle sign” where the fracture of the metacarpal shaft causes a “disappearance” of the metacarpal head  (Img. 4)
 

Img 4. Dropped knuckle sign


Palpation

Img 5. Scaphoid Tubercle

It can be difficult to visualize all of the bones in the hand and wrist in order to palpate them correctly. However, there are a few that emergency medical providers should know in order to catch the most common and consequential injuries.

The scaphoid is technically part of the wrist, however it is usually part of a screening hand exam for anyone with a fall onto a hand. It can be palpated in 3 places:

Img 6. Anatomic snuffbox

  • Scaphoid tubercle   
  • The waist of the scaphoid can be palpated in the anatomic snuffbox 
  • The proximal scaphoid can be palpated on the dorsal wrist in the soft spot between the tendons of the 3rd and 4th compartment of the wrist, just distal to Lister’s tubercle 

Img 7. Lister's Tubercle

Img 8. Proximal Scaphoid

Previous studies have demonstrated that tenderness at the scaphoid tubercle is actually more sensitive than the anatomic snuffbox (95% v. 85%) in diagnosing scaphoid fracture. When palpating the anatomic snuffbox you can maximize the surface area that you are palpating by having the patient move their hand into ulnar deviation and thumb abduction.

Range of Motion

Test range of motion both passively and actively in each joint. Passive ROM gives you information about the joint.  You may feel clicking, catching or crepitance. Active ROM provides information about nerve function, muscle strength, joint congruity/stability, and tendon integrity.

[Insert aforementioned neurovascular exam here]

Muscle/tendon exam

A full muscle/tendon exam doesn’t need to be a part of every exam in the Emergency Department, we don’t have the time. However, if there is an injury that makes you concerned about the integrity of deep structures in the hand, wrist, or forearm, knowing the course and function of each muscle and tendon is useful.  Theoretical cases have been included to provide context.

Case 1:

A patient sustained a deep laceration to his right volar forearm from a glass bottle during an altercation at a bar. The sensory exam in the hand is normal, but function is abnormal.  In addition to the usual laceration care, you want to ensure all of the underlying tendons from the extrinsic muscles are intact. You need to check the finger and wrist flexors. Most of these are innervated by the median nerve, with the exception being the Flexor Carpi Ulnaris and the Flexor Digitorum Profundus to the small and ring fingers, which are innervated by the ulnar nerve.

Img 9. Flexors of forearm

  • Flexor Pollicis Longus (FPL): Test by asking patient to flex thumb at the IP joint (AIN)
  • Flexor Digitorum Profundus (FDP): Test by asking patient to flex DIP joint of index or middle finger while stabilizing PIP of the same digit
  • Flexor Digitorum Superficialis (FDS): Test by asking patient to flex PIP while examiner holds all the other digits in extension (this blocks FDP and completely isolates the FDS)
  • Flexor Carpi Ulnaris and Flexor Carpi Radialis: Test by asking patient to flex the wrist and palpate tendon/muscular contraction


In summary, to test the extrinsic flexors:

  • Flex thumb IP joint
  • Stabilize PIP and have patient flex each DIP in succession
  • Hold remainder of fingers in extension, ask patient to flex each PIP in succession
  • Volar flex wrist


Case 2:

The same patient presents again after a bar fight, this time sustaining a deep laceration to his dorsal forearm.  You want to ensure all of the underlying tendons from the extrinsic muscles are intact. You need to check the extensors.  These muscles are all innervated by the radial nerve and are separated into six compartments.

First Dorsal Wrist Compartment

  • Abductor Pollicis Longus and Extensor Pollicis Brevis: Ask the patient to bring their thumb out to the side (abduct) and palpate the tendons along the radial border of the wrist

Img 10. Extensors of forearm

2nd Dorsal Wrist Compartment

  • Extensor Carpi Radialis Longus (ECRL) and Extensor Carpi Radialis Brevis (ECRB): Have the patient make a fist and extend against resistance

3rd Dorsal Wrist Compartment

  • Extensor Pollicis Longus: Place hand flat on table and lift thumb off the table

4th Dorsal Wrist Compartment (the MCP joint extensors of the fingers)

  • Extensor Digitorum Communis and Extensor Indicis Proprius (EIP): Test by straightening individual fingers at the MCP. The EIP can be isolated by extending index finger with the rest of the fingers closed in a fist

Img 11. Extensors of forearm 

5th Dorsal Wrist Compartment

  • Extensor Digiti Minimi: Extend small finger with the rest of the fingers closed in a fist

6th Dorsal Wrist Compartment

  • Extensor Carpi Ulnaris: Extend and ulnar deviate wrist

In summary, to test the finger extensors:

  • Abduct the thumb, then place on table and lift thumb off
  • Extend fingers against resistance at MCP
  • Make fist and extend wrist against resistance
  • Ulnar deviate fist
  • Extend index finger from closed fist
  • Extend small finger from closed fist

Case 3:

The same unfortunate patient returns after yet another bar fight. His other two lacerations are well healed, but now he has sustained a deep laceration to his right palm. This time you need to check the intrinsic muscles and tendons of the hand. These are innervated by the median and ulnar nerves and are also separated into compartments.

Thenar muscles: both median and ulnar nerve innervation

Img 12. Intrinsic muscles of hand

  • Abductor Pollicis Brevis, Opponens Pollicis, Flexor Pollicis Brevis (median n.): Ask the patient to touch thumb and small finger tips together so the nails are parallel
  • Adductor pollicis (ulnar n.): Have the patient hold paper between thumb base and radial side of 1st finger.  Try to pull the paper away and see if they can hold it.  When the adductor muscle is weak the thumb flexes at the IP joint to grab the paper (Froment’s sign)


Interosseus and Lumbrical: ulnar nerve innervation

Interosseus testing

  • Lumbricals: Flex MCP and straighten IP
  • Interosseus: Adduct and abduct the fingers.  Place the hand flat on table to eliminate interference by extrinsic extensors, hyperextend middle MCP, and move finger from side to side.


Hypothenar muscles: ulnar nerve innervation (difficult to isolate, especially in an injured patient)

  • Abductor Digiti Minimi: Test by abducting small finger
  • Opponens Digiti Minimi: Function to bring small finger towards thumb

In summary, to test the intrinsic muscles of the hand:

  • Touch small finger to the thumb so the nails are parallel
  • Pinch paper between thumb and radial side of index finger in the first webspace
  • Flex MCP and straighten PIP
  • Place hand flat on table, hyperextend at MCP, adduct and abduct each finger
  • Spread fingers against resistance, (also abducts the 5th finger and tests the hypothenar muscles)


-------------------------------------------------------------------------------------------------------------------

Special tests:

There are several tests that can be used to examine for common and important injuries.

Case 4

You are working at a ski clinic in Lake Tahoe as part of an elective rotation. A patient presents after a fall backwards onto his R hand while holding his ski pole.  He has pain in his thumb, especially on the ulnar aspect of the MCP joint.

  • Most likely diagnosis: Skier’s thumb/Gamekeeper's thumb, a rupture of the ulnar collateral ligament (UCL)
  •  Evaluation: Test UCL integrity. Hold thumb metacarpal with one hand, and fully extend thumb MCP and apply gentle radial deviation force to see if there is laxity or pain. Test again at 30 degrees of MCP flexion. Test other thumb as a reference (people vary widely in baseline joint laxity).


Case 5

A patient reports that he was playing pickup basketball, got a finger snagged on the opposing player’s shirt, and felt pain when the player pulled away suddenly.  Now he has difficulty flexing the fingertip.

  • Most likely diagnosis: Jersey finger, a rupture of the FDP tendon from the distal phalanx.
  • Special test:  Hold the patient's MCP and PIP in full extension and ask patient to flex at the DIP. If the FDP is intact the patient will be able to flex at the DIP.  The PIP must be held in full extension to isolate FDP function. 

Case 6

The same patient presents 6 months later, again playing pickup basketball, but this time he got his finger jammed on the ball going up for a rebound.  Now he cannot fully extend it at the tip.

  • Most likely diagnosis: Mallet finger, an avulsion of the extensor digitorum from the distal phalanx.
  • Special test: Hold the middle phalanx of affected finger to isolate DIP and ask patient to actively straighten DIP. If the patient cannot, then the test is positive for Extensor Digitorum injury.  You can also passively extend the tip and see if patient is able to hold it there or if it returns to the flexed position.


Case 7

A patient presents with a deep laceration to the dorsum of his 3rd finger, over the middle phalanx. He appears to be able to extend and flex the finger easily, however as an astute ED physician, you are concerned about occult tendon injury.

Screen Shot 2018-04-14 at 3.40.35 PM.png
  • Most likely diagnosis: Central slip injury, a rupture of the central band of the extensor mechanism causes the lateral bands to slide ventrally, preventing extension of the PIP and extension of the DIP.
  • Special Test: Elston’s test. Passively flex the PIP to 90 degrees to relax the lateral bands. Have patient try to extend the finger and provide counter force on middle phalanx. When the patient tries to extend the PIP test the tension at the DIP: If DIP is floppy the central slip is intact, but if the DIP becomes taut then central slip is injured.

Expert Commentary

Evaluating hand trauma requires understanding the anatomy and the functions associated with that anatomy.  Having a systematic approach helps, as pain, bleeding, intoxication, and fear can affect the upper extremity exam.   It is good practice to start by evaluating for deformity, color change, and wounds.  Ask the patient to make a fist and then open it, which can help direct you to the problem area.  Test wrist flexion and extension.  Evaluate extension of each finger.  Evaluate flexion and extension of the thumb IP.  Evaluate FDP and FDS of each finger.  Test OK sign, fingers crossed (index and middle), spread fingers wide and hold them out against resistance.  Test gross sensation in each fingertip, and on the back of the hand.  If you do this every time, you are unlikely to miss a substantial injury. From the findings of the general hand exam you can then focally test any trouble areas.

Determining adequate perfusion, often via clinical exam (color, temperature, turgor, etc) is critical.  Using a pulse oximeter on an injured finger can help identify threatened digits before the clinical ischemia or venous congestion becomes obvious.  Doppler exam of each digital vessel is another useful evaluation tool. 

Always consider the proximal to distal nature of the anatomy, and tailor the focal exam based on the level of injury.  For example, if a patient presents with an injury at the wrist, testing finger flexion will not give any information about the median nerve.  The level of injury helps guide what additional components of the exam you need to perform to get the full picture, as laid out in the different discussions between cases 1 and 3 above.

The sensory exam is often challenging, especially in traumatized fingers.  Pain can be distracting, and edema can cause sensory changes.  Gentle sharp sensation (pin-prick) testing is a useful adjunct to the digital sensory exam, especially if only one side is injured and you are trying to clarify whether the digital nerve is intact.  Also, if a patient had a tourniquet placed in the field, they may present with an abnormal sensory exam (or even functional exam, depending on duration of ischemia) even if all structures are intact.

And, although this may be an obvious reminder, always document a thorough sensory exam before ever administering local anesthesia. 


Screen Shot 2018-04-14 at 3.45.33 PM.png


Aviram Giladi, MD, MS

The Curtis National Hand Center, MedStar Union Memorial Hospital


 How to cite this post

[Peer-Reviewed, Web Publication]  Whipple T,   Gappmeier V (2018, April 16). Demystifying the Hand Exam.  [NUEM Blog. Expert Commentary by Giladi A ]. Retrieved from http://www.nuemblog.com/blog/hand-exam


Posts you may also enjoy


References

• Ghane, MR et al. How trustworthy are clinical examinations and plain radiographs for diagnosis of scaphoid fractures. Trauma Mon Nov 2016. 21(5): e23345.

• Giuglae, J et al. The palpable scaphoid surface area in various wrist positions. Journal of Hand Surgery. 1 Oct 2015. 40(1): 2039-2044. 

• Netters Orthopedic Clinical Exam. Ed: Cleland, Joshua A., PT, DPT, PhD; Koppenhaver, Shane, PT, PhD; Su, Jonathan, PT, DPT, LMT. Third Edition. Copyright 2017

• Lin, M.  Quick Tip: Elston’s Test for the Finger.  Jul 29 2013. ALiEM.

• Bookman, A. A., von Schroeder, H. P., & Pham, A. G. (2010). The Wrist and Hand. In Fam’s Muskuloskeletal Exam and Joint Injection Techniques (pp. 29–43). Mosby.

• Seiler, JG. (2002). Essentials of Hand Surgery (pp 23-48). Lippincott Williams & Wilkins.