Posts tagged #SonoPro

Sono Pro Tips and Tricks for Acute Appendicitis

Written by: Morgan McCarthy, MD (NUEM ‘24) Edited by: David Feiger, MD (NUEM ‘22)
Expert Commentary by: Shawn Luo, MD & John Bailitz, MD


Welcome to the NUEM SonoPro Tips and Tricks Series where Local and National Sono Experts team up to take you scanning from good to great for a particular diagnosis or procedure.

For those new to the probe, we recommend first reviewing the basics in the incredible FOAMed Introduction to Bedside Ultrasound Book, 5 Minute Sono, and POCUS Atlas. Once you’ve got the basics beat, then read on to learn how to start scanning like a Pro!

Did you know, appendicitis is one of the most common surgical emergencies. Despite this, some data suggests that appendicitis is missed in 3.8% to 15% of children and 5.9% to 23.5% of adults in ED visits. Appendicitis is difficult to diagnose due to the early nonspecific generalized symptoms (anorexia, generalized pain, nausea, diarrhea or constipation). We can use point of care ultrasound (POCUS) to help evaluate your differential diagnosis. One study showed that after only a 20-minute training ED physicians at various levels of experience were able to scan for appendicitis with a specificity of 97.9% and a sensitivity to 42.8%.

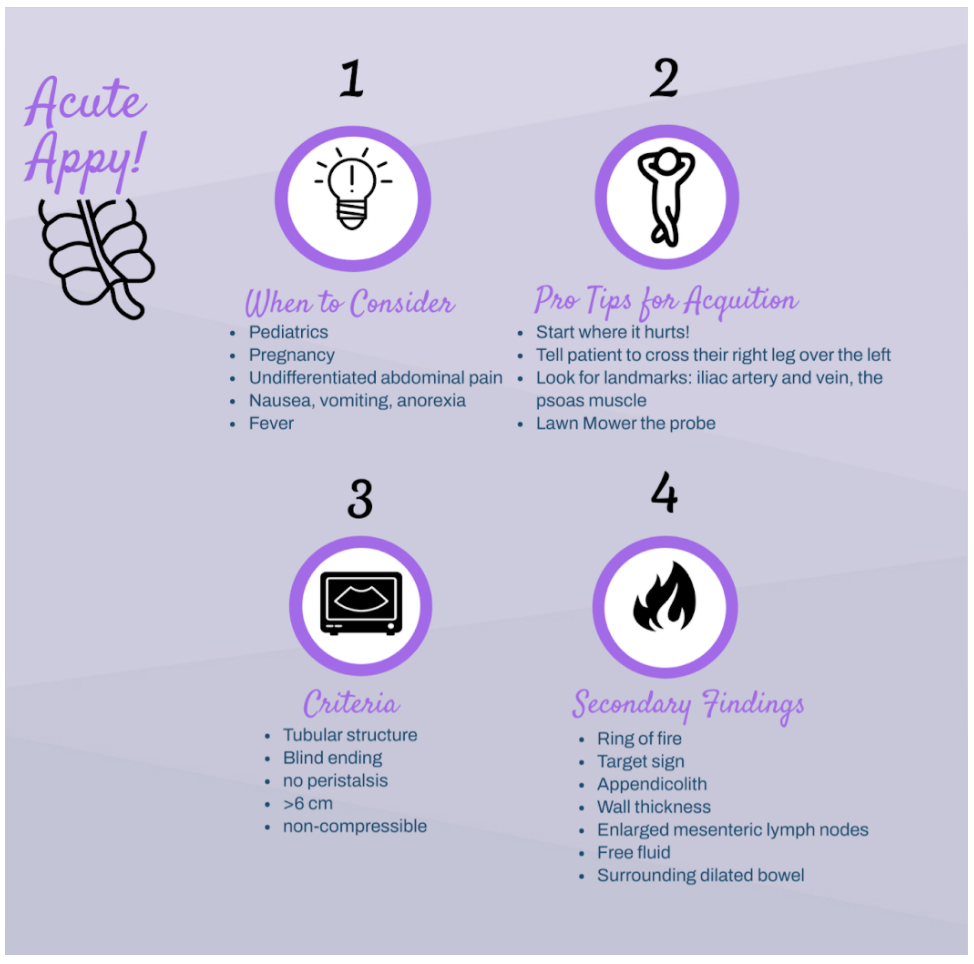
Beyond the classic pediatric patient, who else does the SonoPro scan?

Pocus use for appendicitis is one of the leading diagnostic tools in pediatrics for acute appendicitis. In the pediatric population limiting radiation is generally thought to be of utmost importance. The lack of exposure to radiation and small habitus makes ultrasound a great alternative in the pediatric patient. These tips and tricks can be useful in other high risk adult patients, like pregnant women. It is well known that in adults there is often a higher chance of pathology and surgeons are managing the ultimate say on whether more imaging is necessary. However, the use of ultrasound for acute appendicitis may save time, expedite care, lead to quicker consultation, and potentially augment patient satisfaction and improve outcomes. 

How to scan like a Pro:

  • There are a few ways to scan for the appendix. To start, we recommend simply asking for the patient to point to where the pain is worst and place the probe directly over that spot. 

  •  A simple trick is to have the patient cross their right leg over their left leg; this brings the appendix closer to the abdominal wall. 

  • If neither of these work, start to look for visual landmarks to orient yourself: iliac artery and vein, and the psoas muscle. The psoas muscle will be posterior, the iliac artery will be medial and the iliac crest lateral. Many times the appendix may be on top of the iliac artery. ‘Lawn mowing’ the probe up and down in this area may help it come into view.

What to Look For:

  •  Try to look for a blind ending tubular structure that is not undergoing peristalsis. When you locate this, turn your probe to view the appendix in short axis and measure the anterior to posterior diameter. In a normal appendix this may be shorter than the lateral measurements as a normal appendix is compressible!

  • There are two main criteria for diagnosing appendicitis on ultrasound: 

  1. > 6mm*

  2. non-compressible 

*Note: Make sure to consider your patient’s age; the criteria may not apply to young children as their appendix may be naturally smaller. Appendix growth typically occurs at 3 to 6 years, therefore in this population you may depend more on secondary findings.

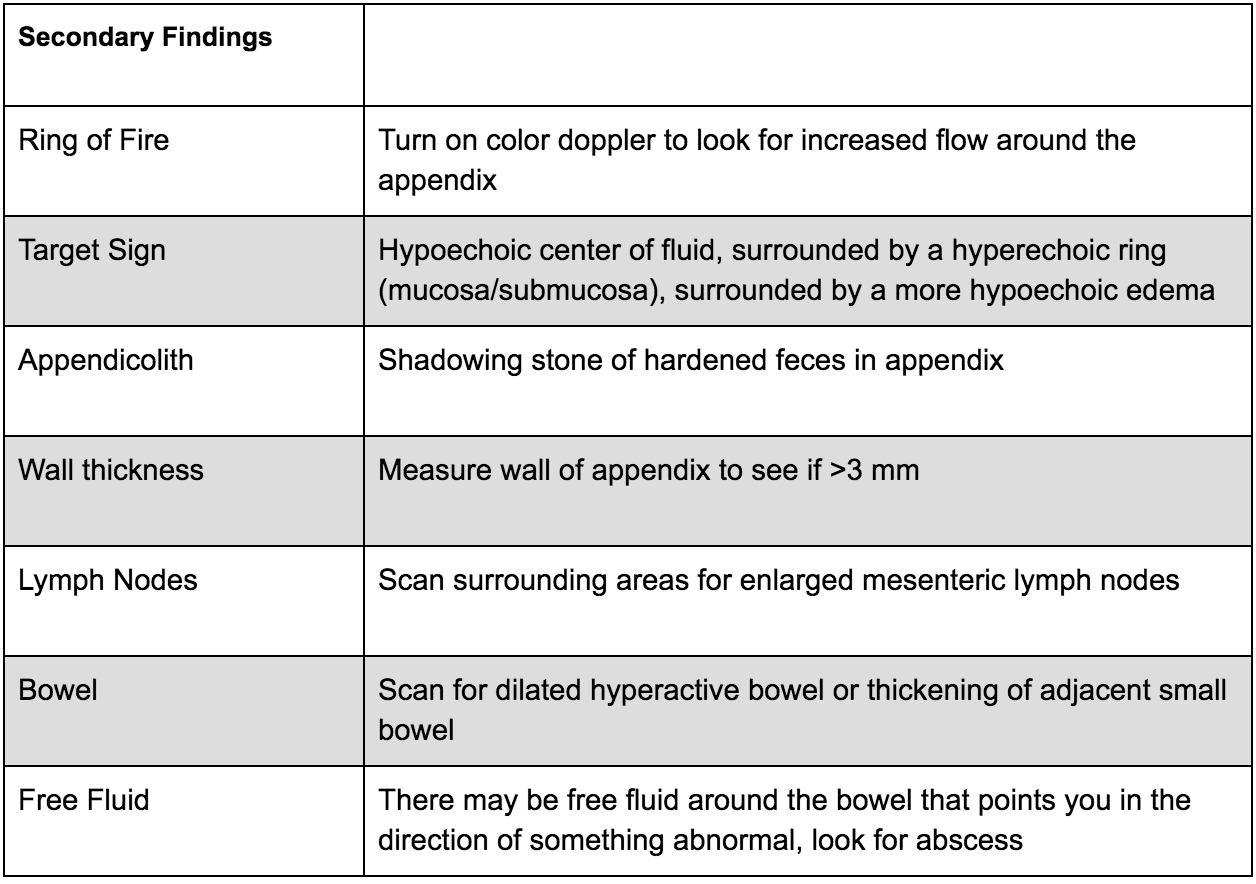
There are many secondary findings that many experts believe may be more useful than the measurements of the appendix itself as this can be very difficult to accurately measure:

What to do next:


Ultrasound for appendicitis is very specific, however not very sensitive. If you see a dilated non-compressible blind ending loop of bowel without peristalsis, you may have identified an appendicitis - call your surgeon, follow recommendations and start antibiotics! If you are uncertain, look for secondary signs of appendicitis as above; if they are found you can increase your suspicion of appendicitis. If these findings are not present, more advanced diagnostic imaging may be required with respect to your clinical suspicion. Consider an MRI in a young patient or CT scan with contrast in an adult for further evaluation.

Where to Learn More (References)

  1. Mahajan P, Basu T, Pai C, et al. Factors Associated With Potentially Missed Diagnosis of Appendicitis in the Emergency Department. JAMA Network Open. 2020;3(3):e200612. doi:10.1001/jamanetworkopen.2020.0612.

  2. Y Ravichandran, P Harrison, E Garrow, and JH Chao. Size Matters: Point of care Ultrasound in Pediatric Appendicitis. Pediatric Emergency Care. 2016; 32: 815-816.

  3. Ma, John, et al. Ma and Mateer's Emergency Ultrasound. McGraw-Hill Education, 2020.

  4. Macias, Micheal. TPA, The Pocus Atlas

  5. Availa, Jacob. 5 minute Sono

  6. US G.E.L. Podcast

  7. Nelson, Chiricolo, Raio, Theodoro, Patel, Johnson. Can Emergency Physicians Positively Predict Acute Appendicitis on Focused Right Lower Quadrant Ultrasound?. Annals of Emergency Medicine, 2005; 46: 27-28


Expert Commentary

Excellent job by Morgan and David on this engaging and informative post summarizing the latest and greatest pro-tips and tricks for POCUS for Appendicitis. POCUS again has been demonstrated to be a helpful adjunct to improve time to diagnosis and treatment when utilized by trained clinicians for appropriate patients. On your next pediatric, pregnant, or otherwise thin “Rule out Appy”, begin the exam by asking the patient to cross their leg to flex the psoas muscle to bring the appendix closer to probe. Have the patient point to the pain to identify where to start. If the appendix is not visualized, then go to McBurney’s point in the axial plane, visualizing the iliac artery & vein to find the nearby appendix. Next, start “lawn mowing” by compressing slowly but with adequate depth to displace bowel gas. Once you see what appears to be an inflamed appendix, trace the structure to verify the blind-ending and hold your probe for a few seconds to confirm the lack of peristalsis. Measure the diameter, then turn on color flow and look for other secondary signs of inflammation. Since the specificity is high, when appendicitis is visualized, call your surgeon, and consider skipping the CT. But remember, since the appendix often “hides” within the bowel the sensitivity is low, so other comprehensive imaging will be needed to reach the correct diagnosis.

John Bailitz, MD

Vice Chair for Academics, Department of Emergency Medicine

Professor of Emergency Medicine, Feinberg School of Medicine

Northwestern Memorial Hospital

Shawn Luo, MD

PGY4 Resident Physician

Northwestern University Emergency Medicine


How To Cite This Post:

[Peer-Reviewed, Web Publication] McCarthy, M. Feiger, D. (2021, Nov 22). Sono Pro Tips and Tricks for Acute Appendicitis. [NUEM Blog. Expert Commentary by Luo, S and Bailitz, J]. Retrieved from http://www.nuemblog.com/blog/sonopro-tips-and-tricks-for-acute-appendicitis


Other Posts You May Enjoy

Posted on November 22, 2021 and filed under Ultrasound.

SonoPro Tips and Tricks for Aortic Aneurysm and Dissection

Written by: John Li, MD (NUEM ‘24) Edited by: Andra Farcas, MD (NUEM ‘21) Expert Commentary by: John Bailitz, MD & Shawn Luo, MD (NUEM ‘22)

Written by: John Li, MD (NUEM ‘24) Edited by: Andra Farcas, MD (NUEM ‘21) Expert Commentary by: John Bailitz, MD & Shawn Luo, MD (NUEM ‘22)


SonoPro Tips and Tricks

Welcome to the NUEM Sono Pro Tips and Tricks Series where Sono Experts team up to take you scanning from good to great for a problem or procedure! For those new to the probe, we recommend first reviewing the basics in the incredible FOAMed Introduction to Bedside Ultrasound Book and 5 Minute Sono. Once you’ve got the basics beat, then read on to learn how to start scanning like a Pro!

Aortic ultrasound is a staple in emergency point of care ultrasound. It has incredible sensitivity (97.5-100%) and specificity (94.1-100%) in detecting abdominal aortic aneurysms and can provide a diagnosis for critically ill patients in seconds. [1-4] However, it can often be a technically difficult study for beginner sonographers due to shadowing bowel gas and patient body habitus. Follow along in this installment of our Sono Pro Tips and Tricks Series to become an expert in finding aortas!

Beyond the classic elderly male smoker with abdominal, flank, or back pain, what are other scenarios where you would use aortic ultrasound?

  1. Older patients with limb ischemia - an aortic aneurysm can have atherosclerosis or a mural thrombus which can embolize and cause an arterial occlusion!

  2. “But they fixed my aorta!” Aortic endograft leakage can sometimes present with symptoms that are similar to a AAA rupture, such as back pain, flank pain, or hemodynamic instability.

How to scan like a Pro

Always Start Smart: Aortic ultrasound can be tricky because of factors that seem out of our control, such as bowel gas or patient body habitus.

  1. When scanning for an abdominal aortic aneurysm, start scanning in the epigastric region with a transverse view and apply constant pressure, gently pushing the bowel gas out of the way as you slide the probe down towards the patient’s feet.

  2. Tell your patients to bend their knees! This relaxes the abdominal musculature and can help you move bowel gas or make better contact with the probe.

What if you still can’t see it? Try looking in the right upper quadrant view of the FAST exam!

  1. Start with your probe in the right mix-axillary line and use the liver as your acoustic window. You may need to fan anteriorly or posteriorly depending on the patient’s body habitus and your positioning.

  2. Unfortunately, this view predominantly visualizes the superior aspect of the abdominal aorta, and it can be difficult to visualize the inferior abdominal aorta or the bifurcation.

Here we are looking at a modified RUQ view, where the aorta is visualized on the bottom part of the screen using the liver as an acoustic window. (acep.org)

Pro Pickups!

  1. What’s that weird aneurysm?

    • Most people are familiar with the classic fusiform aortic aneurysm, but saccular aneurysms can be easily missed because of shadowing bowel gas obstructing parts of the aorta. Saccular aneurysms actually have a higher risk of rupture and repair is recommended for smaller diameters.

Here you can see two images in the longitudinal axis of the different kinds of abdominal aortic aneurysms. On the left is a saccular aneurysm and on the right is a fusiform one. Be sure to pay attention to the mural thrombus in the walls of both of these aortas - they can embolize and cause arterial occlusions! (med.emory.edu)

Here you can see two images in the longitudinal axis of the different kinds of abdominal aortic aneurysms. On the left is a saccular aneurysm and on the right is a fusiform one. Be sure to pay attention to the mural thrombus in the walls of both of these aortas - they can embolize and cause arterial occlusions! (med.emory.edu)

2. How big is that aorta anyways?

  • Be sure to always measure the aorta from outside wall to outside wall!

  • Many aortic aneurysms have a mural thrombus or intraluminal clot, and it can be very easy to mistake these for extra-luminal contents.

  • Remember the concerning numbers: >5.5cm for men and >5cm for women!

What the Pros Do Next

Abdominal Aortic Aneurysm

  1. If the patient is hemodynamically unstable (defined as BP <90/60, altered mental status, or other signs of end-organ damage), go straight to the OR!

  2. If the patient is hemodynamically stable (defined as the absence of any of the above), then the next step is to obtain further imaging, such as a CT Angiogram, which is the imaging gold standard.

    • If you are concerned about a large AAA that could be a contained leak but the patient is hemodynamically stable, then we recommend an emergent vascular surgery consult

    • If you find a small AAA (defined as <5cm in women or <5.5cm in men) that you do not think is actively contributing to the patient’s symptoms, then we recommend outpatient vascular surgery follow up

SonoPro Tips - Where to Learn More

Do you want to review more examples of pathologic images that you may see when you are doing an aortic ultrasound? Be sure to check out The Pocus Atlas by our expert editor Dr. Macias. Aortic pathology is quite rare, and going through these images will help immensely in recognizing this diagnosis in emergent situations.  If you’re interested in looking at some of the evidence behind aortic ultrasound, be sure to check out the evidence atlas here as well.

References

  1. Rubano E, Mehta N, Caputo W, Paladino L, Sinert R. Systematic review: emergency department bedside ultrasonography for diagnosing suspected abdominal aortic aneurysm. Acad Emerg Med. 2013 Feb;20(2):128-38. doi: 10.1111/acem.12080. PMID: 23406071.

  2. Hunter-Behrend, Michelle, and Laleh Gharahbaghian. “American College of Emergency Physicians.” ACEP // Home Page, 2016, www.acep.org/how-we-serve/sections/emergency-ultrasound/news/february-2016/tips-and-tricks-big-red---the-aorta-and-how-to-improve-your-image/.

  3. Ma, John, et al. Ma and Mateer's Emergency Ultrasound. McGraw-Hill Education, 2020.

  4. Mallin, Mike, and Matthew Dawson. Introduction to Bedside Ultrasound: Volume 1. Emergency Ultrasound Solutions, 2013.

  5. Macias, Michael. TPA, www.thepocusatlas.com/.


Expert Commentary

Another great Sono Pro Post! Thank you John Li and Andra for helping everyone move from good to great when scanning for Abdominal Aortic Aneurysms. As noted, this application defines Emergency Ultrasound as a fast (pun intended), accurate, and life saving diagnostic tool for every EM physicians tool belt. When consistent probe pressure does not do the trick, consider the RUQ view for a quick look. Since most AAA’s are fusiform, this may quickly confirm your suspicions and prompt the call to get the OR ready. Be sure to visualize the entire abdominal aorta throughout in both short and long axis to identify saccular aneurysms and even the rare aortic occlusion!

John Bailitz, MD

Vice Chair for Academics, Department of Emergency Medicine

Professor of Emergency Medicine, Feinberg School of Medicine

Northwestern Memorial Hospital

Shawn Luo, MD

PGY4 Resident Physician

Northwestern University Emergency Medicine


How To Cite This Post:

[Peer-Reviewed, Web Publication] Li, J. Farcas, A. (2021 Oct 11). SonoPro Tips and Tricks for Aortic Aneurysm. [NUEM Blog. Expert Commentary by Bailitz, J. Shawn, L.]. Retrieved from http://www.nuemblog.com/blog/sonopro-tips-and-tricks-for-aortic-aneurysm


Other Posts You May Enjoy

SonoPro Tips and Tricks for Pulmonary Embolism

Written by: Megan Chenworth, MD (NUEM ‘24) Edited by: Abiye Ibiebele, MD (NUEM ‘21) Expert Commentary by: John Bailitz, MD &amp; Shawn Luo, MD (NUEM ‘22)

Written by: Megan Chenworth, MD (NUEM ‘24) Edited by: Abiye Ibiebele, MD (NUEM ‘21) Expert Commentary by: John Bailitz, MD & Shawn Luo, MD (NUEM ‘22)


SonoPro Tips and Tricks

Welcome to the NUEM Sono Pro Tips and Tricks Series where Sono Experts team up to take you scanning from good to great for a problem or procedure! For those new to the probe, we recommend first reviewing the basics in the incredible FOAMed Introduction to Bedside Ultrasound Book and 5 Minute Sono. Once you’ve got the basics beat, then read on to learn how to start scanning like a Pro!

Did you know that focused transthoracic cardiac ultrasound (FOCUS) can help identify PE in tachycardic or hypotensive patients? (It has been shown to have a sensitivity of 92% for PE in patients with an HR>100 or SBP<90, and approaches 100% sensitivity in patients with an HR>110 [1]). Have a hemodynamically stable patient with PE and wondering how to risk stratify? FOCUS can identify right heart strain better than biomarkers or CT [2].

Who to FOCUS on?

  1. Patients presenting with chest pain or dyspnea without a clear explanation, or with a clinical concern for PE. The classic scenario is a patient with pleuritic chest pain with VTE risk factors such as recent travel or surgery, systemic hormones, unilateral leg swelling, personal or family history of blood clots, or known hypercoagulable state (cancer, pregnancy, rheumatologic conditions).

  2. Patients presenting with unexplained tachycardia or dyspnea with VTE risk factors

  3. Unstable patients with undifferentiated shock

  4. When PE is suspected but CT is not feasible: such as when the patient is too hemodynamically unstable to be moved to the scanner, too morbidly obese to fit on the scanner, or in resource-limited settings where scanners aren’t available

    1. One may argue AKI would be another example of when CT is not feasible (though there is some debate over the risk of true contrast nephropathy - that is a discussion for another blog post!)

How to scan like a Pro

  1. Key is to have the patient as supine as possible - this may be difficult in truly dyspneic patients

  2. If difficulty obtaining views arise, the left lateral decubitus position helps bring the heart closer to the chest wall

FOCUS on these findings

You only need one to indicate the presence of right heart strain (RHS).

  1. Right ventricular dilation

  2. Septal flattening: Highly specific for PE (93%) in patients with tachycardia (HR>100) or hypotension (SBP<90) [1]

  3. Tricuspid valve regurgitation

  4. McConnell’s sign

    • Definition: Akinesis of mid free wall and hypercontractility of apical wall (example below)

    • The most specific component of FOCUS: 99% specific for patients with HR>100bpm or SBP<90 [1]

  5. Tricuspid annular plane systolic excursion (TAPSE)

  • The most sensitive single component of FOCUS: TASPE < 2cm is 88% sensitive for PE in tachycardic and hypotensive patients; 93% sensitive when HR > 110 [1]

Where to FOCUS

Apical 4 Chamber (A4C) view: your best shot at seeing it all

  1. Find the A4C view in the 5th intercostal space in the midclavicular line

  2. Optimize your image by sliding up or down rib spaces, sliding more lateral towards the anterior axillary line until you see the apex with the classic 4 chambers - if the TV and MV are out of the plane, rotate the probe until you can see both openings in the same image; if the apex is not in the middle of the screen, slide the probe until the apex is in the middle of the screen. If you are having difficulty with this view, position the patient in the left lateral decubitus.

  3. Important findings:

    1. RV dilation: the normal RV: LV ratio in diastole is 0.6:1. If the RV > LV, it is abnormal. (see in the image below)

    2. Septal flattening/bowing is best seen in this view

    3. McConnell’s sign: akinesis of the free wall with preserved apical contractility

McConnell’s Sign showing akinesis of the free wall with preserved apical contractility

4. Tricuspid regurgitation can be seen with color flow doppler when positioned over the tricuspid valve

Tricuspid regurgitation seen with color doppler flow

Tricuspid regurgitation seen with color doppler flow

5. TAPSE

  • Only quantitative measurement in FOCUS, making it the least user-dependent measurement of right heart strain [3]

  • A quantitative measure of how well the RV is squeezing. RV squeeze normally causes the tricuspid annulus to move towards the apex.

  • Fan to bring the RV as close to the center of the screen as possible

  • Using M-mode, position the cursor over the lateral tricuspid annulus (as below)

  • Activate M-mode, obtaining an image as below

  • Measure from peak to trough of the tracing of the lateral tricuspid annulus

    • Normal >2cm

How to measure TAPSE using ultrasound

How to measure TAPSE using ultrasound

Parasternal long axis (PSLA) view - a good second option if you can’t get A4C

  1. Find the PSLA view in the 4th intercostal space along the sternal border

  2. Optimize your image by sliding up, down, or move laterally through a rib space, by rocking your probe towards or away from the sternum, and by rotating your probe to get all aspects of the anatomy in the plane. The aortic valve and mitral valve should be in plane with each other.

  3. Important findings:

    1. RV dilation: the RV should be roughly the same size as the aorta and LA in this view with a 1:1:1 ratio. If RV>Ao/LA, this indicates RHS.

    2. Septal flattening/bowing of the septum into the LV (though more likely seen in PSSA or A4C views)

Right heart strain demonstrated by right ventricle dilation

Right heart strain demonstrated by right ventricle dilation

Parasternal Short Axis (PSSA) view: the second half of PSLA

Starting in the PSLA view, rotate your probe clockwise by 90 degrees to get PSSA

  1. Optimize your image by fanning through the heart to find the papillary muscles - both papillary muscles should be in-plane - if they are not, rotate your probe to bring them both into view at the same time

  2. Important findings:

    1. Septal flattening/bowing: in PSSA, it is called the “D-sign”.

“D-sign” seen on parasternal short axis view. The LV looks like a “D” in this view, particularly in diastole.

“D-sign” seen on parasternal short axis view. The LV looks like a “D” in this view, particularly in diastole.

Subxiphoid view: can add extra info to the FOCUS   

  1. Start just below the xiphoid process, pointing the probe up and towards the patient’s left shoulder

  2. Optimize your image by sliding towards the patient’s right, using the liver as an echogenic window; rotate your probe so both MV and TV are in view in the same image

  3. Important findings

    1. Can see plethoric IVC if you fan down to IVC from RA (not part of FOCUS; it is sensitive but not specific to PE)

Plethoric IVC that is sensitive to PE

Plethoric IVC that is sensitive to PE

What to do next?

Sample algorithm for using FOCUS to assess patients with possible PE. *cannot completely rule out PE, but negative FOCUS makes PE less likely

Sample algorithm for using FOCUS to assess patients with possible PE.

*cannot completely rule out PE, but negative FOCUS makes PE less likely

Limitations to keep in mind:

  1. FOCUS is great at finding heart strain, but the lack of right heart strain does not rule out a pulmonary embolism

    1. Systematic review and meta-analysis concluded that the overall sensitivity of FOCUS for PE is 53% (95% CI 45-61%) for all-comers [5]

  2. Total FOCUS exam requires adequate PSLA, PSSA, and A4C views – be careful when interpreting inadequate scans

  3. Can see similar findings in chronic RHS (pHTN, RHF)

    1. Global thickening of RV (>5mm) can help distinguish chronic from acute RHS

    2. McConell’’s sign is also highly specific for acute RHS, whereas chronic RV failure typically appears globally akinetic/hypokinetic

8.png

SonoPro Tips - Where to Learn More

  1. Right Heart Strain at 5-Minute Sono: http://5minsono.com/rhs/

  2. Ultrasound GEL for Sono Evidence: https://www.ultrasoundgel.org/posts/EJHu_SYvE4oBT4igNHGBrg, https://www.ultrasoundgel.org/posts/OOWIk1H2dePzf_behpaf-Q

  3. The Pocus Atlas for real examples: https://www.thepocusatlas.com/echocardiography-2

  4. The Evidence Atlas for Sono Evidence: https://www.thepocusatlas.com/ea-echo

References

  1. Daley JI, Dwyer KH, Grunwald Z, Shaw DL, Stone MB, Schick A, Vrablik M, Kennedy Hall M, Hall J, Liteplo AS, Haney RM, Hun N, Liu R, Moore CL. Increased Sensitivity of Focused Cardiac Ultrasound for Pulmonary Embolism in Emergency Department Patients With Abnormal Vital Signs. Acad Emerg Med. 2019 Nov;26(11):1211-1220. doi: 10.1111/acem.13774. Epub 2019 Sep 27. PMID: 31562679.

  2. Weekes AJ, Thacker G, Troha D, Johnson AK, Chanler-Berat J, Norton HJ, Runyon M. Diagnostic Accuracy of Right Ventricular Dysfunction Markers in Normotensive Emergency Department Patients With Acute Pulmonary Embolism. Ann Emerg Med. 2016 Sep;68(3):277-91. doi: 10.1016/j.annemergmed.2016.01.027. Epub 2016 Mar 11. PMID: 26973178.

  3. Kopecna D, Briongos S, Castillo H, Moreno C, Recio M, Navas P, Lobo JL, Alonso-Gomez A, Obieta-Fresnedo I, Fernández-Golfin C, Zamorano JL, Jiménez D; PROTECT investigators. Interobserver reliability of echocardiography for prognostication of normotensive patients with pulmonary embolism. Cardiovasc Ultrasound. 2014 Aug 4;12:29. doi: 10.1186/1476-7120-12-29. PMID: 25092465; PMCID: PMC4126908.

  4. Hugues T, Gibelin PP. Assessment of right ventricular function using echocardiographic speckle tracking of the tricuspid annular motion: comparison with cardiac magnetic resonance. Echocardiography. 2012 Mar;29(3):375; author reply 376. doi: 10.1111/j.1540-8175.2011.01625_1.x. PMID: 22432648.

  5. Fields JM, Davis J, Girson L, et al. Transthoracic echocardiography for diagnosing pulmonary embolism: a systematic review and meta‐analysis. J Am Soc Echocardiogr 2017;30:714–23.e4.


Expert Commentary

RV function is a frequently overlooked area on POCUS. Excellent post by Megan looking specifically at RV to identify hemodynamically significant PEs. We typically center our image around the LV, so pay particular attention to adjust your views so the RV is optimized. This may mean moving the footprint more laterally and angle more to the patient’s right on the A4C view. RV: LV ratio is often the first thing you will notice. When looking for a D-ring sign, make sure your PSSA is actually in the true short axis, as a diagonal cross-section may give you a false D-ring sign. TAPSE is a great surrogate for RV systolic function as RV contracts longitudinally. Many patients with pulmonary HTN or advanced chronic lung disease can have chronic RV failure, lack of global RV thickening. Lastly remember, that a positive McConnell’s sign is a great way to distinguish acute RHS from chronic RV failure.

John Bailitz, MD

Vice Chair for Academics, Department of Emergency Medicine

Professor of Emergency Medicine, Feinberg School of Medicine

Northwestern Memorial Hospital

Shawn Luo, MD

PGY4 Resident Physician

Northwestern University Emergency Medicine


How To Cite This Post:

[Peer-Reviewed, Web Publication] Chenworth, M. Ibiebele, A. (2021 Oct 4). SonoPro Tips and Tricks for Pulmonary Embolism. [NUEM Blog. Expert Commentary by Bailitz, J. Shawn, L.]. Retrieved from http://www.nuemblog.com/blog/sonopro-tips-and-tricks-for-pulmonary-embolism


Other Posts You May Enjoy

SonoPro Tips and Tricks for Pneumothroax

Written by: Morgan McCarthy, MD (NUEM ‘24) Edited by: Jon Hung, MD (NUEM ‘21) Expert Commentary by: John Bailitz, MD & Shawn Luo, MD (NUEM ‘22)


SonoPro Tips and Tricks

Welcome to the NUEM Sono Pro Tips and Tricks Series where Sono Experts team up to take you scanning from good to great for a problem or procedure! For those new to the probe, we recommend first reviewing the basics in the incredible FOAMed Introduction to Bedside Ultrasound Book and 5 Minute Sono. Once you’ve got the basics beat, then read on to learn how to start scanning like a Pro!

Did you know that Lung Ultrasound (LUS) has a higher sensitivity than the traditional upright anteroposterior chest X-ray for the detection of a pneumothorax? (LUS has a reported 90.9 for sensitivity and 98.2 for specificity. CXR were 50.2 for sensitivity and 99.4 for specificity). Busy trauma bay? Ultrasound is faster than calling for X-ray. Critically ill patient? Small pneumothoraces are less likely to be missed with ultrasound. To take your Sono Skills to the next level, read on:

Beyond the classic trauma patient during your E-Fast Exam, who else does the Sono-Pros scan?

  1. Primary spontaneous pneumothorax: the classic scenario is a tall, young adult, with symptoms such as breathlessness, along with potentially those with risk factors of pneumothoraxes such as smoking, male sex, family history of pneumothorax

  2. Secondary spontaneous pneumothorax: those with underlying lung disease including but not limited to COPD, tuberculosis, necrotizing pneumonia, pneumonocystis carini, lung cancer, sarcoma involving the lung, sarcoidosis, endometriosis, cystic fibrosis, acute severe asthma, idiopathic pulmonary fibrosis

  3. Of course, traumatic pneumothorax, especially in penetrating trauma or blunt trauma with broken ribs

  4. Don’t forget iatrogenic causes of pneumothorax including transthoracic needle aspiration, subclavian vessel puncture, thoracentesis, pleural biopsy, and mechanical ventilation

SonoPro Tips - How to scan like a Pro

  1. The key is to have the patient completely supine - air rises! - with the probe in the anterior field in sagittal orientation pointing towards the patient's head.

  2. It is commonly taught to start at the second intercostal space, midclavicular line, and scan down a few lung spaces to at least the 4th intercostal space, however, keep in mind some studies show that trauma supine trauma patients had pneumothoraces seen more commonly in the 5-8 rib spaces.

  3. Important Landmarks

Green = Subcutaneous tissue. Red = Pleural space. Blue = A - lines.

4. Look for lung sliding, improve your image by turning down gain and decrease depth to have lung sliding become clearer

What to Look For:

  1. To Rule-Out a pneumothorax

  • Lung Sliding - Lung sliding has a negative predictive value of 100% for ruling out a pneumothorax, however only at that interspace

  • Additional Findings: B-lines and Z lines also help to rule out pneumothorax!

2. To Rule-In a pneumothorax

  • Lung point - the interface between where lung sliding is happening and where the absence of lung sliding is happening has been shown to have 100% specificity for pneumothorax.

  • Keep in mind the border of where the heart and lung come in contact and the border where the diaphragm and lung come in contact can cause a false lung point.

  • The lung point may be hard to find in a larger pneumothorax, and impossible to find in a completely collapsed lung.

3. Next turn on M-mode:

Sandy Beach Shore = Lung sliding (left). Barcode Sign = No lung sliding (right)

Sandy Beach Shore = Lung sliding (left). Barcode Sign = No lung sliding (right)

What to do next:

  1. Lung sliding = sensitive, Lung point = specific

  2. If you see lung sliding, there is no pneumothorax

  3. If you do not see lung sliding it does not rule in a pneumothorax -> look for a lung point, the interface between where lung sliding is happening and where the absence of lung sliding is happening to rule it in

    • Always keep in mind other causes that result in lack of lung sliding before management decisions take place!: atelectasis, main-stem intubation, adhesions, contusions, and arrest or apnea. Check out this great table from 5 - Min Sono.

4. If your patient is apneic or has a mainstem intubation look for lung pulse, when the heart beats if the parietal and visceral pleura are touching (no pneumothorax) it will show a pulse at the interfaces of the pleura

5. Sub-Q emphysema - Always look for E - lines. When there is subcutaneous air above the pleural line it creates a false pleural line above the actual pleural. You may also see B-lines obscuring the actual pleural line. This is most likely subcutaneous air and you can not interpret it for a pneumothorax.

SonoPro Tips - Where to Learn More

  1. American College of Emergency Physicians. Emergency ultrasound imaging criteria compendium. Ann Emerg Med. 2006;48(4):487-510.

  2. Ma, John, et al. Ma and Mateer's Emergency Ultrasound. McGraw-Hill Education, 2020.

  3. Macias, Micheal. TPA, The Pocus Atlas.

  4. Availa, Jacob. 5 minute Sono.

  5. US G.E.L. Podcast

  6. Alrajhi K, Woo MY, Vaillancourt C. Test characteristics of ultrasonography for the detection of pneumothorax: a systematic review and meta-analysis. Chest. 2012;141(3):703-708.


Expert Commentary

Morgan went “beyond lung sliding” and dove deep into how to increase your sensitivity & specificity for PTX with POCUS. Supine is ideal to make PTX visible against the anterior chest wall, but if the patient cannot tolerate lying flat, look at the apical pleural superior to the clavicles. First, identify the true pleural line--it should be the bright line just deep to the ribs in your view. SQ emphysema may obscure the view or even mimic the pleura, although its outline is usually more hazy & irregular, a little pressure helps to move the SQ air out of the way can be helpful. Sliding? Great, PTX ruled out. But absent sliding does not automatically mean PTX. Make sure there is no B-line or “lung pulse”, as sometimes pleural adhesion or poor ventilation can cause absent sliding too. Most of the time you don’t need M-mode unless the movement is very subtle and you want to be extra sure. The lung point is pathognomonic for PTX, but don’t waste time digging around for it if the patient is unstable with a good clinical story for PTX > decompress instead!

John Bailitz, MD

Vice Chair for Academics, Department of Emergency Medicine

Professor of Emergency Medicine, Feinberg School of Medicine

Northwestern Memorial Hospital

Shawn Luo, MD

PGY4 Resident Physician

Northwestern University Emergency Medicine


How To Cite This Post:

[Peer-Reviewed, Web Publication] McCarthy, M. Hung J. (2021 Sept 20). SonoPro Tips and Tricks for Pneumothorax. [NUEM Blog. Expert Commentary by Bailitz, J. Shawn, L.]. Retrieved from http://www.nuemblog.com/blog/sonopro-tips-and-tricks-for-pneumothorax


Other Posts You May Enjoy

Posted on September 20, 2021 and filed under Ultrasound, Pulmonary, Trauma.

SonoPro Tips and Tricks for Acute Cholecystitis

Written by: John Li, MD (NUEM ‘24) Edited by: Amanda Randolph (NUEM ‘21) Expert Commentary by: John Bailitz, MD &amp; Mike Macias, MD

Written by: John Li, MD (NUEM ‘24) Edited by: Amanda Randolph (NUEM ‘21) Expert Commentary by: John Bailitz, MD & Mike Macias, MD


SonoPro Tips and Tricks

Welcome to the NUEM Sono Pro Tips and Tricks Series where Sono Experts team up to take you scanning from good to great for a problem or procedure!

For those new to the probe, we recommend first reviewing the basics in the incredible FOAMed Introduction to Bedside Ultrasound Book and 5 Minute Sono. Once you’ve got the basics beat, then read on to learn how to start scanning like a Pro!

Point of care right upper quadrant ultrasound has been shown to be a highly sensitive (82-91%), specific (66-95%), cost effective and efficient modality for emergency medicine physicians to quickly and effectively identify biliary pathology [1-5]. But despite its widespread utility, right upper quadrant ultrasound can often be a technically difficult study for the beginner sonographer, as there are multiple factors that can influence its ease of acquisition ranging from patient body habitus to bowel gas shadowing, and sonographer experience has been shown to influence its efficacy [1, 6-7].

Beyond the classic patient with right upper quadrant pain, what other scenarios do Sono-Pros use right upper quadrant ultrasound?

  1. Epigastric abdominal pain being “diagnosed” and even over treated as GERD. Pick up the probe in the symptomatic patient taking their PPI, EGD negative, or already treated for H. pylori

  2. Unexplained right shoulder or back pain. 

  3. Colicky pain in the right flank but no urinary findings of nephrolithiasis. 

  4. My gallstones are back! But my gallbladder is gone. Look for choledocholithiasis.

  5. Chronically ill elderly or immunosuppressed patients with unexplained fever or sepsis. 

SonoPro Tips - How to scan like a Pro

Always Start Smart: To Fail to Prepare is to Prepare to Fail whether in ED POCUS or ED Thoracotomy.

  1. Start with the patient in either the left lateral decubitus position or supine with the bed at approximately 30 degrees.

  2. Let the patient know “I’ll be asking you throughout this brief exam to take medium to deep breaths and hold for 5 sec, then automatically breathe out.” 

Still not not getting great views? 

  1. Scan between the ribs to use the liver as an acoustic window and avoid bowel gas. Switch to a small footprint phased array probe if needed. 

    • Not sure which intercostal space to use? Try about 7 centimeters to the right of the patient’s xiphoid process!

  2. Ask the patient to position their arms above their head to open the intercostal space. 

  3. Ask the patients to bend their knees to relax the abdominal muscles.

  4. In young, thin patients, the gallbladder may be more anterior and superior-- if you are scanning subcostally, try flattening out the probe even more!

Even a Small Pain in the Neck can be a Big Problem!

  1. Don’t forget the neck. There is a reason the gallbladder was so nicely distended and  easy to find. Be sure to scan carefully in two orthogonal planes to pick up subtle stones in the neck of the gallbladder!

    • If there is a lot of nearby bowel gas, tell your tech to look for these stones if your surgeons require a confirmatory comprehensive radiology ultrasound before operating. 

In this GIF, you can see a long-axis view of the gallbladder. When you are initially looking at the body and the fundus of the gallbladder, there are no clear shadowing stones. However, as the sonographer fans to the neck of the gallbladder, they can visualize multiple stones, which are casting shadows posteriorly. Image courtesy of the POCUS Atlas.

SonoPro Tips - Pro Pick Ups!

  1. Is that a stone or is that something else in the gallbladder? Roll the patient and see if the “stone” moves! 

    • If the stone in the fundus or body moves, then it’s more likely a mobile stone. 

    • If it doesn’t move, then consider a polyp or a malignancy. Polyps or malignancies generally are non-shadowing while stones are shadowing!

    • Impacted, “non-mobile” Neck Stone = Big Problem and likely to progress to acute cholecystitis. 

  2. What’s causing that shadow?

    • Stones shadow posteriorly. 

    • Edges shadow on the sides. Edge artifact results when ultrasound beams scatter passing by a smooth-walled structure, creating an anechoic stripe that could be confused with true shadowing!

  3. What if the entire gallbladder is casting a shadow?

    • Think about a gallbladder FULL of stones! This will cause only the most anterior stones to show up on ultrasound.

Here, on the right side of the screen you see a cross section of the gallbladder that has a large stone in it-- this is casting a shadow so you do not see the posterior wall of the gallbladder at all. This is called the wall echo sign-- where you will only see the most anterior surface of the stone. Image courtesy of the POCUS Atlas.

4. What are some of those pesky mimics of acute cholecystitis?

  • Think about hepatic pathologies! Acute hepatitis can cause a clinical Murphy’s sign. You can also have patients who present similarly when they have a congestive hepatopathy from their CHF. Even cirrhotic patients can present with a tender RUQ!

Here, you can see a dilated gallbladder with a thickened anterior wall and a small amount of pericholecystic fluid, all of which are consistent with acute cholecystitis. Image courtesy of the POCUS Atlas.

In this still image, you can see a thickened gallbladder wall (although be sure to measure the anterior wall, as the posterior wall can be thickened due to posterior acoustic enhancement!) and a small amount of pericholecystic fluid.  Image courtesy of the POCUS Atlas.

Here, you can see a dilated gallbladder with an obstructing stone in the neck of the gallbladder. Image courtesy of the POCUS Atlas.

SonoPro Tips - What the Pro’s Do Next!

Infographic courtesy of Justin Seltzer, MD

  1. If you see nonshadowing masses in the gallbladder:

    • Measure it! If the polyp is >1cm, then there’s a ~50% chance that this could be malignant, so be sure to refer these patients for additional imaging and close follow up. 

  2. What if you’re hoping to be really thorough and get a beautiful image of the CBD, but despite your best efforts, you cannot find it?

    • Draw some LFTs! A number of our emergency medicine colleagues, including Becker et. al and Lahham et. al, have done studies on this and it has been shown to be very unlikely that the CBD will be pathologically dilated in the setting of normal LFTs. On the flip side, if the LFTs appear cholestatic in nature, that’s another indication for a right upper quadrant ultrasound! [9-10]

SonoPro Tips - Where to Learn More

Do you want to see more pathologic images that you may see when you are doing a right upper quadrant ultrasound? Be sure to check out The Pocus Atlas by our expert editor Dr. Macias! It’s a great resource that also shows some of the rarer etiologies of gallbladder pathology, such as emphysematous cholecystitis or choledocholithiasis.

If you’re interested in looking at some of the evidence behind the right upper quadrant ultrasound, be sure to check out the evidence atlas here as well!


Expert Commentary

Thank you to NWEM1 John Li for bringing this great idea for a NUEM Blog Series to life. And another thanks to NUEM Blog Founder Mike Macias for his help on both content and graphics!

This new series is intended to push your Sono skills from just good, to really great. We will not rehash the basics. There are already abundant great resources available that we are truly thankful for and utilize everyday. But instead, we will share SonoPro Tips to help you more quickly master challenging POCUS applications and procedures. 

And there is no place better to start than Acute Cholecystitis. This is a great differentiator between the average and the expert clinician sonographer. As John outlines, start smart by expanding your indications and positioning your patient properly from the get go. Then breath, not you, the patient. Breath and hold again and again to bring the gallbladder and even difficult to discern pathology into clear view. Go beyond getting stones, and work to pick up, and explain other pathologies, as well as the bile ducts when needed.  

Thanks again John and Mike! Looking forward to the next post in this new series...

John-Bailitz.png

John Bailitz, MD

Vice Chair for Academics, Department of Emergency Medicine

Professor of Emergency Medicine, Feinberg School of Medicine

Northwestern Memorial Hospital

michael macias.PNG

Michael Macias, MD

Global Ultrasound Director, Emergent Medical Associates

Clinical Ultrasound Director, SoCal MEC Residency Programs


How To Cite This Post:

[Peer-Reviewed, Web Publication] Li, J. Randolph, A. (20201 Mar 22). SonoPro Tips and Tricks for Acute Cholecystitis. [NUEM Blog. Expert Commentary by Bailitz, J. Macias, M]. Retrieved from http://www.nuemblog.com/blog/sonopro-tips-and-tricks-for-acute-cholecystitis


Other Posts You May Enjoy

References

  1. Jain A, Mehta N, Secko M, Schechter J, Papanagnou D, Pandya S, Sinert R. History, Physical Examination, Laboratory Testing, and Emergency Department Ultrasonography for the Diagnosis of Acute Cholecystitis. Acad Emerg Med. 2017 Mar;24(3):281-297. doi: 10.1111/acem.13132. PMID: 27862628.

  2. Miller, Adam H., et al. “ED Ultrasound in Hepatobiliary Disease.” The Journal of Emergency Medicine, vol. 30, no. 1, 2006, pp. 69–74., doi:10.1016/j.jemermed.2005.03.017. 

  3. Shekarchi B, Hejripour Rafsanjani SZ, Shekar Riz Fomani N, Chahardoli M. Emergency Department Bedside Ultrasonography for Diagnosis of Acute Cholecystitis; a Diagnostic Accuracy Study. Emerg (Tehran). 2018;6(1):e11. Epub 2018 Jan 20. PMID: 29503836; PMCID: PMC5827043.

  4. American College of Emergency Physicians: Emergency Ultrasound Imaging Criteria Compendium. Oct. 2014, www.acep.org/globalassets/new-pdfs/policy-statements/emergency-ultrasound-imaging-criteria-compendium.pdf. 

  5. Hilsden R, Leeper R, Koichopolos J, et al. Point-of-care biliary ultrasound in the emergency department (BUSED): implications for surgical referral and emergency department wait times. Trauma Surg Acute Care Open. 2018;3(1):e000164. Published 2018 Jul 30. doi:10.1136/tsaco-2018-000164

  6. Ma, John, et al. Ma and Mateer's Emergency Ultrasound. McGraw-Hill Education, 2020. 

  7. Mallin, Mike, and Matthew Dawson. Introduction to Bedside Ultrasound: Volume 2. Emergency Ultrasound Solutions, 2013. 

  8. Macias, Michael. TPA, www.thepocusatlas.com/. 

  9. Becker BA, Chin E, Mervis E, Anderson CL, Oshita MH, Fox JC. Emergency biliary sonography: utility of common bile duct measurement in the diagnosis of cholecystitis and choledocholithiasis. J Emerg Med. 2014 Jan;46(1):54-60. doi: 10.1016/j.jemermed.2013.03.024. Epub 2013 Oct 11. PMID: 24126067.

  10. Lahham S, Becker BA, Gari A, Bunch S, Alvarado M, Anderson CL, Viquez E, Spann SC, Fox JC. Utility of common bile duct measurement in ED point of care ultrasound: A prospective study. Am J Emerg Med. 2018 Jun;36(6):962-966. doi: 10.1016/j.ajem.2017.10.064. Epub 2017 Nov 20. PMID: 29162442.

Posted on March 22, 2021 and filed under Ultrasound.